A Handmade Greeting Card Sending Happy Birthday Wishes

Hello My Fellow Crafters,

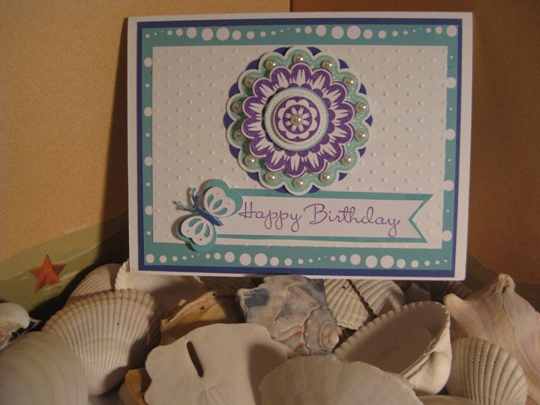
I want to share with you a handstamped birthday card that I just finished for my brother-in-law.  I don’t know who ever came up with the in-law part,  I feel that I gained more brothers and sisters once I got married (25 years ago)  Anyway, let’s get back to the card 🙂

handstampedbirthdaycardidea

Giving this handstamped birthday card alot of though, I decided to use the triple time stamping technique.  I didn’t take pictures of each step but here are the sizes for each layer.

White – three pieces cut into 2″  x 3  1/4″, 3″  x 4 1/4″ and 4″  x 5 1/4″

Bubble Gum Green – three pieces cut into 2 1/4″ x 3 1/2″, 3 1/4″ x 4 1/2″ and  5 1/2″

Then for the base of the card I used Midnight Muse cardstock cut 8 1/2″ x 6″

If you want to see all the steps you can reference post: Handstamped Greeting Card Using Triple Time Stamping Technique

For the inside of the card I wanted to bring some of the great colors from the outside in, so I cut some strips of the cardstock and added to just the one corner.

The best part about making handmade cards is that you can keep adding fun embellishments until you slip the card into the envelope and put it into the mailbox.

handstampedbirthdaycardinside

All the rubber stamps and cardstock are from my stash of Stampin’ Up supplies.  What I love about all of the stamps, ink and cardstock is that they all coordinate perfectly.

~ Happy Birthday Bruce ~

Make It A Great Day and Don’t Forget To Leave Time To Craft!

Climbing A Fence To Say Hello

Hello My Fellow Crafters,

Today I want to share with you the cutest birthday card that just makes me smile, because I can see my cat looking like this if he was an outdoor cat 🙂

I was going through my stamps and came across this stamp (which was the paw) and I had no idea what it was.  So, as I continued looking the most adorable cat face rubber stamp jumped out and then I remembered this set from a rubber stamp convention that  I went to years ago.

The stamp set is from Biblical Impressions (not sure if they still make this stamp). I started with white cardstock and tuxedo black memento ink.  Then using copic markers I started coloring, and the entire time I couldn’t stop smiling at this face.  That’s why I really think that crafting is the best, because it puts you in such a happy place, watching yourself create your own original works of art.

iseeyouhandmadebirthdaycard

Then I found a stamp of a fence that is from Art Impressions.  I stamped it twice onto brown cardstock and using a scissor I cut the tops of the fence so it looked rigid and for a straight bottom I used a Fiskars paper cutter.

Once I put it all together it looked a little too white so I took a sponge dabber and using memento Bahama Blue ink I added some color for a background and decided to use the same color cardstock to mat onto a larger white card base.

For the inside I wanted to keep the theme of the fence, so I used the same brown cardstock, fence stamp and black memento ink.  I thought it would be so fun to make a sign that could be hanging on the fence.  So,  I made a little sign with plain white cardstock, added some antique mini brads and so there were no sharp edges I layered the back onto the same colored cardstock I used on the front of the card. Then using some brass wire I made the happy birthday sign and attached it to the fence with another mini antique brad.  The part that I really like is that the sign moves from side to side since I didn’t permanently attach it to the fence. (I had to take a close up picture because I forgot to take the picture before I added all my handwritten message to the card)

iseeyouinsidehandmadebirthdaycard

I would suggest that you go thru some of your stamps and see what new/old ones you can dig up and create something fantastic.  I hope this card made you smile 🙂

~ Happy Birthday Poppa ~

Make It A Great Day and Don’t Forget To Leave Time To Craft!

Card Supplies:

Handstamped Birthday Card For a Cat Lover

Hello My Fellow Crafters,

Most of you know that I have two furry children, and I am sure just like real children they can make you mad, sad but most of all happy.  Well this card just makes me happy.   I don’t know if it’s the colors that I used or just the image of these two cats but I really like how it turned out.

I stamped the image (Magenta cling stamp) with Memento black ink on white cardstock  and then colored in the image with just a few Copic markers.  I have no idea who makes the polka dot paper cause it was in my folder of scraps, and the solid lavender cardstock is from the Paper Cut.  The finishing touch was adding some ribbon and a pearl embellishment.

handstampedgreetingcardcatsinwindow

I still had some scraps left over so for the inside I stamped Happy Birthday and layered it on top of the same cardstock I used for the outside of the card.

handstampedgreetingcardsentiment

Hope you like this card. It was really fun to make, now I have to wait for someones birthday so I can send it out.  I think this is the first time I am ahead of the game in making a card 🙂

Make It A Great Day and Don’t Forget To Leave Time To Craft!


Card Supplies:

Handstamped Greeting Card Using Triple Time Stamping Technique

Hello My Friends,

I have a new handstamped greeting card idea with a new technique that I just learned and it looks great so I just had to share with you.  It’s called the triple time stamping.  I’m sure you can stamp as many layers as you like but this one is done in triple layers.

You can use any colors that you want I just loved the combination of these colors.

The first thing you need to do is cut some card stock.

White – three pieces cut into 2″  x 3″  1/4″, 3″  x 4 1/4″ and 4″  x 5 1/4″

Navy – three pieces cut into 2 1/4″ x 3 1/2″, 3 1/4″ x 4 1/2″ and 8 1/2″ x 5 1/2″

Now the fun part begins.  Take the three pieces of the  white cardstock and put just one little spot of adhesive on the back of each one (just enough to hold it down but not really stick, cause you will be removing it) and then layer each piece on top of one another

tripletimestampingtechniquestep1

Now all you need to do is stamp the image as if it was a single sheet of cardstock.  You will see the white lines around the stamped image but don’t worry you will never know once we are done.

When you are all done stamping, gently take apart each layer and put them onto the Navy cardstock.

Since the inside of the card is Navy card you may want to cut a piece of white cardstock and stamp a little something inside to bring the card all together.

To finish the card you just have to layer the pieces on top of each other, matching the design.  It feels like I am making a  stamping puzzle.

tripletimestampingtechniquejoanscraftworld

Well, what do you think?  Doesn’t it look great?  And it really wasn’t hard to make either.  Hope you enjoyed this new triple time stamping technique.

Make It A Great Day & Don’t Forget to Leave Time To Craft!

Flower Stamp Birthday Card Idea

Hello My Stamping Friends,

Have you ever made a card and when it was complete said to yourself or out loud “Wow that looks Fantastic”?  Well, that’s what  just did ~ LOL

Using just one stamp, a few paper punches, and embellishments and look how beautiful this card is 🙂

I recently found a box in my craft room that had alot of “old” stamping products.  I mean like maybe 10 years old.  Anyway, it was filled with lots of cardstock and ink pads (I use to love to emboss everything and I purchased every color that was available in pigment inks)

This very special Birthday Card below was made with the a Flower stamp and a Happy Birthday stamp, but i just had to use some of the old products that I found.

Wishing You A Day Filled With Sunshine & Stamps

Page 4 of 7
1 2 3 4 5 6 7