Happy Thursday Everyone

Hello My Fellow Crafters,

Hope everyone is having a great day.  It started out raining here in North Florida but now the sun is shining and the geese and ducks in our lake are quacking 🙂

A few weeks ago I added some storage cubes to my craft room and you know what that means… you find some wonderful things.

Well I found a wood stamp set from Stampin’ Up! called Stella Stamper.  The sticker says it’s from 1999.  It is the cutest set and in the middle of my cleaning/reorganizing I had to make this handstamped greeting card.

stamping stella card

I stamped the image with tuxedo black memento ink and colored with Copic markers, then finished it off by adding some “bling” and its done.

Make It A Great Day and Don’t Forget To Leave Time To Craft!

Flower Patch Birthday Wishes

Hello My Fellow Crafters,

I hope you are all enjoying your weekend.  It has been Super Hot here in North Florida, and as much as I love the beach and pool, on days this hot and humid, crafting in air conditioning is so much more enjoyable 🙂

Since our move I am still re-arranging my “Craft World” and finding some really fun supplies that I haven’t used in awhile, along with some new items too.

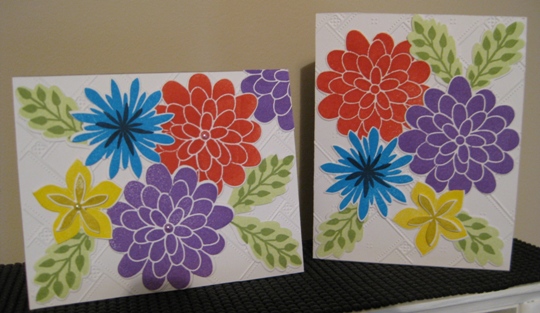
So these cards have been made with fun color inks from different manufacturers.  The greens, bright blue and purple are Memento Dye inks, and the red, dark blue and yellows are from Stampin’ Up.

All the stamps used are from the new Stampin’ Up Flower Patch set that also has the matching thin dies that you can run through a Sizzix or a Cuttlebug machine.

The white cardstock is from Close To My Heart, that was embossed with a Cuttlebug embossing folder from Anna Griffin.


flowerpatchhandmadegreetingcards

The great thing about making cards like these is that you can use them for any occasion.  It’s just when you stamp your inside sentiment that you make it a certain kinda card such as birthday, anniversary, thinking of you…..  But these cards were made for Birthdays.

I think I need to keep staying cool in my “Craft World” ~  Come back for a visit to see what I create for my next card.

Make It A Great Day and Don’t Forget To Leave Time To Craft!


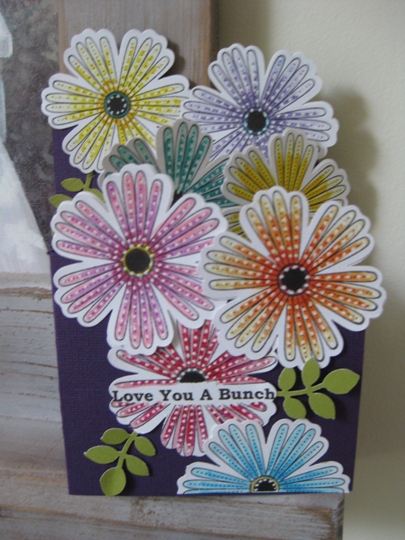
Love You A Bunch Handstamped Birthday Card

Hello My Fellow Crafters,

Have you ever had so much fun making a card that you totally get lost in your own little world?  Well I have and I just did 🙂

I took a piece of cardstock and stamped the same flower image in it until it filled up the page. then just started coloring with every Copic marker that I have.  When I was done I punched  each one out with the paper punch.
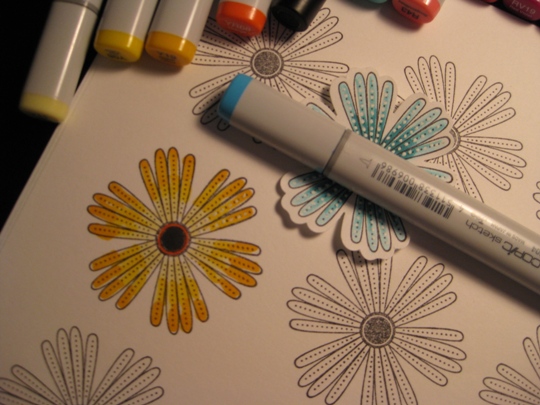
coloringcopics

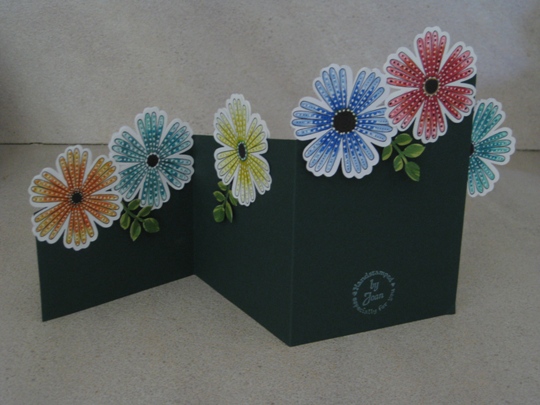
So now I had this pile of flowers and needed to create some kind of card so put these beautiful flowers on.  I remember seeing a card that was cut on an angle and then folded into thirds.  I cut a piece of cardstock 12″ x 5 1/2″.  Then I marked the cardstock on the right side at 2 1/2″  and from that point to the point at the top of the card at 5 1/2″ I cut the cardstock on that angle.  Then scored at 4″ 8″ and folded with peaks and valley fold.

Once I put the flowers onto the card, I noticed once it was open that that backs of the flowers were just plain white cardstock and really didn’t like the way it looked.  So, I  colored more flowers and used adhesive to make a double sided flower.  Now it looks great from all angles.
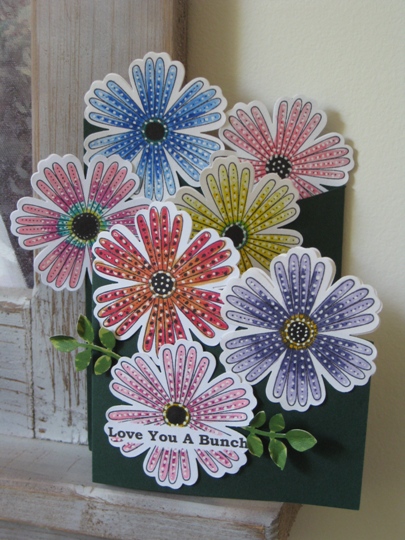
2014 love you a bunch green

2014 green back

I also had a paper punch of leaves and just added some randomly around the card for the final special touch and dimension.

This was a great card to make when you just feel like coloring.  You can use Copic markers like I did, or colored pencils, watercolors, anything that you like to color with will work great!  Remember it’s you artwork and you can do anything that makes you happy when you create.
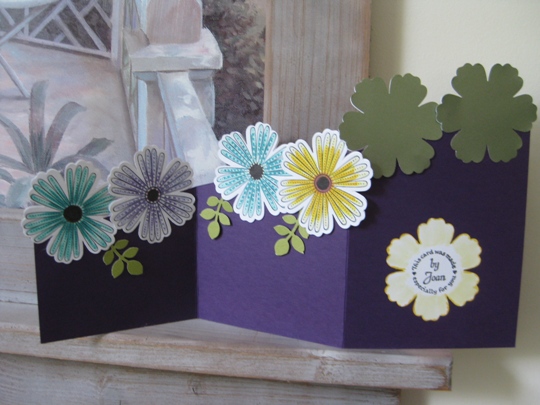
2014 purple love you a bunch

2014 back purple love you a bunch

I really had fun so decided to make another card but just changed the base of the cardstock.  Also I added my circle handmade stamp and made it the center of the flower.

~ Sending Happy Birthday Wishes to my niece Nicole and also to my Mother-In-Law ~

Make It A Great Day and Don’t Forget To Leave Time To Craft!
Happy Fall Ya’ll

Hello My Fellow Crafters.

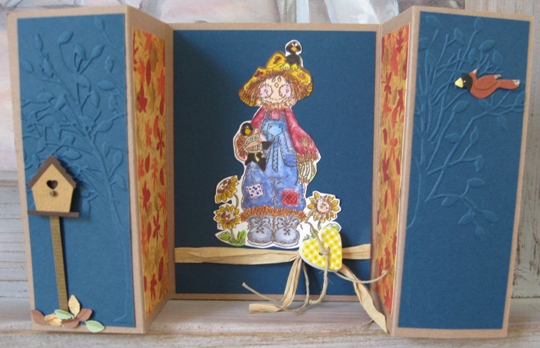
Fall is my favorite time of year.  Pumpkins, scarecrows, beautiful colors of the leaves changing and the list can go on and on.  Today I want to share with you a fall handstamped/handmade greeting card that came out pretty darn cute 🙂

handmadegreetingcardscarecrow

This Scarecrow was stamped on white cardstock with tuxedo black memento ink, colored with Copic sketch markers, then cut out using cutter-bee scissors.  I wanted some texture and dimension to this card so I decided to use  the Cuttlebug.   I took the two blue panels and put them into an embossing folder of a tree, so when the card is closed you can see the entire tree.

As cool as that looked it still needed “something” so using a paper punch of small leaf I punched out some leaves and used small dots for some dimension.  Then I found some 3D stickers in my stash of this birdhouse and bird, so thought that would be the perfect addition.  Still this card needed some more color so I cut two panels of colorful fall leaf cardstock.  Once I added those panels the colors of the scarecrow came to life.  Finished it off with some raffia and a wooden heart shaped button.

~ Happy Fall Ya’ll ~

Make It A Great Day and Don’t Forget To Leave Time To Craft!

Handstamped Greeting Card Using Triple Time Stamping Technique

Hello My Friends,

I have a new handstamped greeting card idea with a new technique that I just learned and it looks great so I just had to share with you.  It’s called the triple time stamping.  I’m sure you can stamp as many layers as you like but this one is done in triple layers.

You can use any colors that you want I just loved the combination of these colors.

The first thing you need to do is cut some card stock.

White – three pieces cut into 2″  x 3″  1/4″, 3″  x 4 1/4″ and 4″  x 5 1/4″

Navy – three pieces cut into 2 1/4″ x 3 1/2″, 3 1/4″ x 4 1/2″ and 8 1/2″ x 5 1/2″

Now the fun part begins.  Take the three pieces of the  white cardstock and put just one little spot of adhesive on the back of each one (just enough to hold it down but not really stick, cause you will be removing it) and then layer each piece on top of one another

tripletimestampingtechniquestep1

Now all you need to do is stamp the image as if it was a single sheet of cardstock.  You will see the white lines around the stamped image but don’t worry you will never know once we are done.

When you are all done stamping, gently take apart each layer and put them onto the Navy cardstock.

Since the inside of the card is Navy card you may want to cut a piece of white cardstock and stamp a little something inside to bring the card all together.

To finish the card you just have to layer the pieces on top of each other, matching the design.  It feels like I am making a  stamping puzzle.

tripletimestampingtechniquejoanscraftworld

Well, what do you think?  Doesn’t it look great?  And it really wasn’t hard to make either.  Hope you enjoyed this new triple time stamping technique.

Make It A Great Day & Don’t Forget to Leave Time To Craft!

Page 1 of 2
1 2