A Rubber Stamp And Some Copic Sketch Markers Make the Perfect Father’s Day Card

I wanted this years handmade Father’s Day card to have a special meaning.  My husbands parents have alot of bird feeders on there lake front property and they love to see all the beautiful birds that come to the feeders.  They also have bears that frequently help themselves to the bird food.

So for this years card I used the House Mouse rubber stamp and colored in the image with Copic Sketch markers.  I then layered the image onto a solid piece of cardstock and layered again onto a very soft piece of cardstock that brought all the colors together.

housemouserubberstampandcopicsketchmarkers

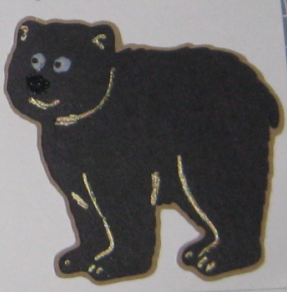
Now how does a bear come into this Fathers Day Card, well here is the inside of the card.  I computer generated the saying but then I cut out a bear with my Cricut Expression machine using the Animal Kingdom Cricut cartridge.  Well I had to crop the inside since when I took the picture it had our mushy sentiments inside but this is what is said:

wishing_you_a_beary_happy

animalkingdomcricutcartridgebear

Wishing the Best Poppa a Very Happy Father’s Day!

Make is a Great Day and don’t forget to leave time to Craft!

Making Handmade Greeting Cards Are The Best Way To Say Happy Birthday

Happy Spring Everyone!

I’ve been making some birthday cards for my Mom and Sister-in-law who’s birthdays are this month and a day apart.  I’ve been doing so much with my Cricut Expression, that I wanted to change things up and rubber stamp these cards and use  Copic Sketch markers to color them in.

I think the best way to say Happy Birthday is with making Handmade Greeting Cards.  When you take the time to make a handmade card,  it is not just a card that you are giving  but it’s also a gift from the heart.

So for the first card I stamped this cute House Mouse Bunny with black Memento Ink and then used Copic Sketch markers for the coloring.  I then cut out this bunny and attached it with pop dots onto the dark blue cardstock panel that was layered on a white card.  With silver ink I stamped the sentiment on the front and inside of this card.  I think this handmade greeting card came out really cute.  I hope that Lin Marie likes her card.

handmadegreetingcardsstampedcopicmarkers

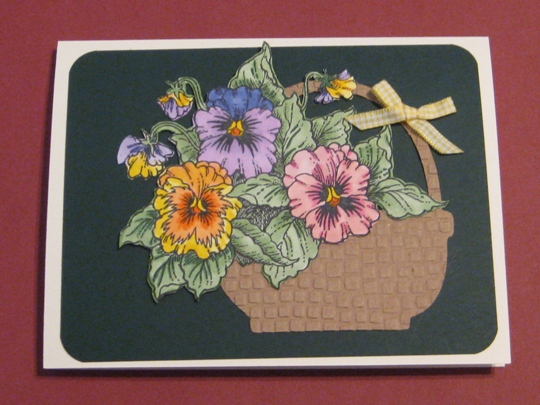
Now for the second card I stamped these beautiful pansy flowers, again with Memento black ink on white cardstock, and colored with Copic Sketch markers.  Then I cut the flowers out and attached to dark green cardstock that was layered on a cream colored  card.  Then I was thinking of what to do next and decided to put these flowers into a basket so I just had to use my Cricut Expression machine to cut out a basket from the Doodlecharms Cricut cartridge, then used my Cuttlebug with a Cuttlebug and embossing folder to put some texture on the basket.  I arranged the flowers on the basket and finished it off with a tiny bow on the handle of the basket.  My Mom is going to love her basket of flowers.

handmadegreetingcardshandstampedandcricutexpression

It is so much fun when you incorporate different techniques when making handmade greeting cards.  You sure don’t get caught in a rut this way, and the results are fantastic!

~Wishing my Mom and Lin Marie a Very Happy Birthday~

Make it a Great Day and don’t forget to leave time to Craft!

Annual Rubber Stamp Show

I almost forgot to tell you that I went to our local Rubber Stamp Show this weekend with my girlfriend Kim.  This was her first show and she was like a kid in a candy store.  She was only use to the rubber stamps and the stamping supplies that you see in the local craft stores.

I’m not sure what’s going on with this wonderful craft, but boy did this show get smaller then it was in previous years and to boot they are only have one show this year not two.

I did notice that one vendor in particular was busy.  They were selling Copic markers.  It seems like people are just finding or hearing about these markers, hey you know that I love them.   Anyway, I found just a few things this year that I needed (we all need some new stamps right?).  One was a cute stamp set that has just four stamps but it is of the four seasons which I thought was cute and also a stamp of my two favorite things a cat holding a cup of coffee.  I also got some good deals on ink pads and embossing paste, other than that Kim got the rest. She bought so many different kinds of things that she’s going to have to show me how they turn out.  For instance, blank domino (no dots) that she is going to stamp on with her new butterfly stamps, she also got some chip board blocks to stamp on, lots of brass stencils, and I better stop telling you all the cool stuff she got just in case her hubby is reading this post  ~ LOL.

Check out rubber stamp events online to see if they will be in your area, and if they are go check out the different kind of things that you just don’t find in your local craft store.

Make it a Great Day and don’t forget to leave time to Craft!

Exciting Re-Design of Joans Craft World is Now Complete

Joans Craft World has undergone a face-lift so to speak. We’ve chosen a new layout to improve our expression (making it brighter and more airy) and there is still our awesome content here for your enjoyment. We’re looking to share many more tidbits with you about what we all love – getting lost in the world of making our crafts!     In that regard, keep an eye out for our shopping suggestions as we have provided you with some great short-cuts to the stuff you deserve to have to use in your creations. Here are some quick menu selections:

Rubber Stamping Stuff

Scrapbooking Stuff

Make it a Great day and don’t forget to leave time to Craft!

ORGANIZING YOUR CRAFT SUPPLIES – Part 2 of 3

Continued From Yesterday:

** Storage Containers. Do a little bit of research and purchase a Scrapbooking and/or Rubber Stamp organizer, which will hold papers, rubber stamps, supplies, etc. There are many products on the market that can help you keep it all together. Many office supply stores carry six-drawer organization stations. They’re vertical and have 6 see-through drawers of equal size. Each drawer can be designated for a different purpose -papers, templates/die-cuts, stickers, etc. Plus, they have wheels, which make them very easy to transport from one room to another. Or, if you often bring your Scrapbooking or Rubber Stamping supplies outside of your home when attending a crop party or to a friend’s house, use a portable system that isn’t too heavy and comes with a handle and wheels for easy transport. Again my favorite is Crop-In-Style Navigator. It holds everything that you need for a night out or weekend scrapping event. If you are a Stamper, Crop-In-Style also has a tote that has drawers inside to hold your rubber stamps and supplies called the Stamp Store that works really well.

** Try a kitchen gadget caddy. If you always Scrapbook and make Handmade Greeting Cards at home, use a kitchen utensil caddy with a number of divided compartments, like those you normally keep tall kitchen spoons, ladles, and spatulas in. They hold your markers and embossing powders in them perfectly. The ones that spin will you’re your most used supplies at your fingertips.

** Hang it up. If you’re lucky enough to have a Craft Room specifically for you Scrapbooking and/or making Handmade Greeting Card, hang a large pegboard above your work area. You can then attach scissors, templates, crimpers, rulers, stencils and more, all within easy sight and reach. In addition, you might hang a small ledge or shelf nearby, to store all of your corner punches, paper trimmers, embossing powders, and so on. If you prefer everything out in the open, this system will work like a charm. Check out the new Rack system by Lisa & Becky.

** Save stickers and shapes. Stickers and punched shapes can be kept in acid-free sheet protectors, plastic baseball card sheets, business card sheets. Each sheet should be categorized and labeled by theme: birthday, Christmas, Halloween, wedding, springtime, etc. Insert these sheets into a 3-ring binder. If you have a large number of stickers and shapes, you may want to purchase a sticker binder designed just for stickers. My favorite is from Crop-In-Style sticker binder.

** Minimize and organize magazines. Are your bookcase/shelves full of Scrapbooking magazines and or Handmade Greeting Card magazines? You can go through your magazines, find the articles you wish to keep and organize them into file folders by category, or in a 3-ring binder. In other words, keep the articles, toss the magazines. There are many Special Edition Magazines that I store in a large 3 ring binder all in tact.

** Choose a designated work area. Scrapbooking is more fun and less of a chore when everything is in one place. If possible designate a room, or a portion of a room, in your home for this activity .Organize your work area for increased productivity. Make sure it’s well lit. Find a comfortable chair to sit on and keep your supplies and tools within arm’s reach.

Organizing your craft supplies Part 1

Organize Scrapbooking Room Part 3

Page 3 of 4
1 2 3 4