A Simple Handstamped Birthday Card For A Cat Person

Hello My Fellow Crafters,

Every time that I make a greeting card I take a few pictures.  Well my file is getting really big, which means that I have not shared with you all of my fun creations.

This card was for my sister-in-laws birthday.  She loves cats, plus her cat is really fluffy like the cat in this rubber stamp by Stampabilities.  I wanted to keep the card simple, yet not boring so I embellished with some ribbon from Ribbon Trends and the small flower that I made with the Flower Shoppe Cricut cartridge and Cricut Expression machine.

handstamped birthdaycard

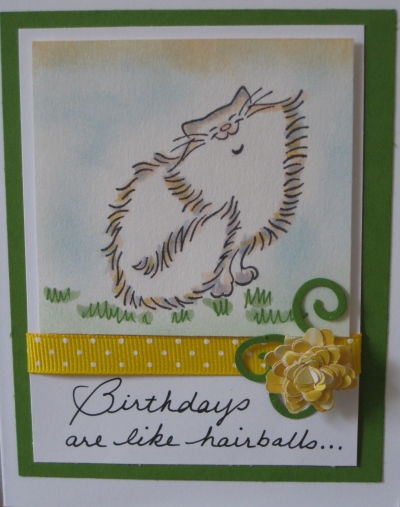
Using Copic sketch markers I just outlined the image and it gave it just the right amount of color.  The very muted background was done with a sponge dauber and memento inks.

I have heard this saying before and I thought it was really funny but didn’t have a stamp, so I used my own handwriting and wrote the sentiment on the front of the card as well as the inside.  The rest of the saying inside reads… The more you have the more you want to gag.

The smile on the cat is so confident and is telling us that, I am cute and I know it 🙂

Make It A Great Day and Don’t Forget To Leave Time To Craft!

Turning an Old Dark Picture Frame Into A Bright New One

Hello My Fellow Crafters,

Today I want to share with you something a little different.  I have my baby picture that was hanging in my parents house. I really didn’t need my baby picture hanging in my house but the frame brought back so many great memories I didn’t want to get rid of it.  I really didn’t like the dark wood gold leaf not my kind of frame.  So what I decided to do was make all those happy memories into a bright happy frame.

I was so excited to start painting this frame I never took a picture of the old one, so I had to call my sister and ask her to take a picture of her frame. We hung on the same wall in our parents house for 40+ years.  Our brothers picture was in the middle of ours but since he was the first born he had a bigger  frame that didn’t have gold flowers. I guess no matter how old we got, we were always our parents babies.

 beforepaintedpictureframe          afterpaintedpictureframe

And after a few hours of having fun with paint from Valspar color samples in the summer palette collection and can’t forget the “bling” I glued a rhinestone in-between each circle, this frame turned out pretty darn good if I do say so myself 🙂

framedpaintjars

I have so much paint left over, I can’t wait to see what else I will find to paint in these Happy Colors.  It was fun painting on something other then paper.  And now I can say that I hand painted a picture frame.  Don’t get me wrong I still love paper and ink, but this was good for a change of pace.

Make It A Great Day and Don’t Forget To Leave Time To Craft!


A Day At The Beach Handmade Birthday Card

Hello My Fellow Crafters,

Today I want to share with you a birthday card that I hand stamped for my father-in-law aka Poppa.

I just think the stamps from Art Impression are so funny.  When I started designing this card I took this relaxed man sitting in a chair and decided to put him on the beach, under a palm tree.  That’s a good way to spend your birthday if you asked me 🙂

dayatbeachcard

Since I don’t have an air brush and I didn’t want to use lots of different color cardstock for the background, I decided to take out my watercolor pencils that have been in this pouch for years and see what I could do.  I also used some Copic Sketch  markers to color this guys clothes.

watercolorpencils

Once I stamped the palm tree it looked like it was just growing in the middle of the sand, so I found a stamp of this boat in my stash of rubber stamps, and once I added it to the bottom of the tree it totally looked like it belongs.  Added some layers of cardstock to the base of the card, attached some brass brads to the corners and it’s done.

It still amazes me how by just using 3 rubber stamps you can make such a cool handmade/handstamped greeting card.

~ Hope you enjoyed your Day At The Beach ~

Make It A Great Day and Don’t Forget To Leave Time To Craft!

Love You A Bunch Handstamped Birthday Card

Hello My Fellow Crafters,

Have you ever had so much fun making a card that you totally get lost in your own little world?  Well I have and I just did 🙂

I took a piece of cardstock and stamped the same flower image in it until it filled up the page. then just started coloring with every Copic marker that I have.  When I was done I punched  each one out with the paper punch.

coloringcopics

So now I had this pile of flowers and needed to create some kind of card so put these beautiful flowers on.  I remember seeing a card that was cut on an angle and then folded into thirds.  I cut a piece of cardstock 12″ x 5 1/2″.  Then I marked the cardstock on the right side at 2 1/2″  and from that point to the point at the top of the card at 5 1/2″ I cut the cardstock on that angle.  Then scored at 4″ 8″ and folded with peaks and valley fold.

Once I put the flowers onto the card, I noticed once it was open that that backs of the flowers were just plain white cardstock and really didn’t like the way it looked.  So, I  colored more flowers and used adhesive to make a double sided flower.  Now it looks great from all angles.

2014 love you a bunch green

2014 green back

I also had a paper punch of leaves and just added some randomly around the card for the final special touch and dimension.

This was a great card to make when you just feel like coloring.  You can use Copic markers like I did, or colored pencils, watercolors, anything that you like to color with will work great!  Remember it’s you artwork and you can do anything that makes you happy when you create.

2014 purple love you a bunch

2014 back purple love you a bunch

I really had fun so decided to make another card but just changed the base of the cardstock.  Also I added my circle handmade stamp and made it the center of the flower.

~ Sending Happy Birthday Wishes to my niece Nicole and also to my Mother-In-Law ~

Make It A Great Day and Don’t Forget To Leave Time To Craft!

Cuttlebug Birthday Card

Hello My Fellow Crafters,

This is a busy month for Birthdays in our family and I have to also make some cards for birthdays that were last month (sorry Luke and Riley)  So I really have to be creative and not make the same card over and over.  I am loving this bakers twine, it adds such a perfect accent to all kinds of creations 🙂

2014 rileys birthday card

Using Memento tuxedo place ink I stamped the image of the flower twice, since I wanted to use a pop dot for a layered look.  Colored the flower with Copic sketch markers, and added some Stickles for the extra shimmer.

Then took out the Cuttlebug and cut the green cardstock using a Framelit Labels die from Sizzix.   Added some bakers twine by just wrapping around the paper and tied a knot.  Put the pop dot on top of the knot and added the stamped flower.

The card just needed more, so again I used the Cuttlebug but this time used an embossing folder of Big Dots, and craft cardstock.  I still needed to stamp happy birthday someplace, and I found some metal frames in a container with some rhinestone brads. This wound be perfect.  Since the brads went in the back of the Big Dot embossed cardstock I put another layer of cardstock behind so it wouldn’t tear the white base card.

The great thing about using a Cuttlebug is that you can cut images with thin metal dies (Framelits) and also emboss with all of the embossing folders on the market.

Thanks for stopping by today.  Hope this birthday card gives you some good ideas when you are making your own handmade greeting card.

~ Happy Birthday Riley ~

Make It A Great Day and Don’t Forget To Leave Time To Craft!

Page 2 of 5
1 2 3 4 5