Making Ornaments with Stampin’ Up! Christmas Gleaming

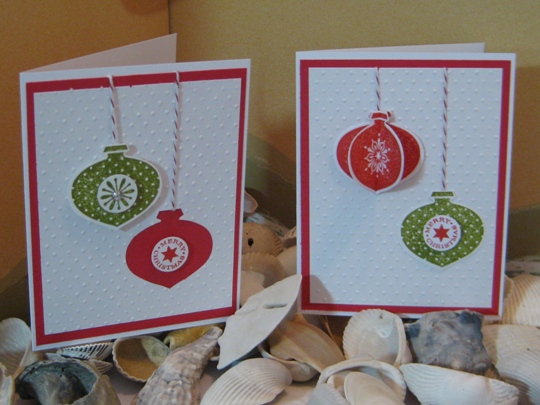
I am in love with this stamp set Christmas Gleaming with coordinating ornament punches.

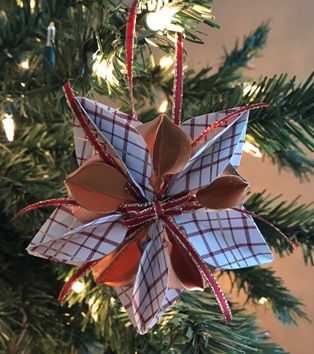
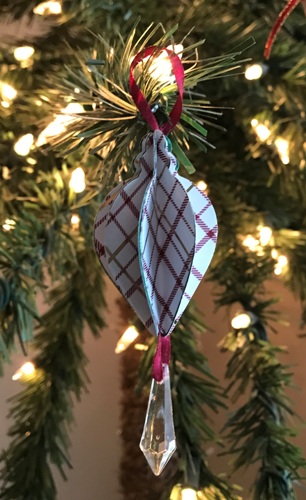
Of course you will be able to make beautiful Christmas Cards and scrapbook pages,but did you know that you can also make gorgeous 3D Ornaments for your tree.

You can find this great set on page 31 in the 2019 Holiday Catalog. But you need to hurry because the Holiday Catalog is coming to an end on January 2, 2020.

The best part is there is still time to order these punches so you can start making ornaments for your tree next year or get a head start on Christmas gifts.

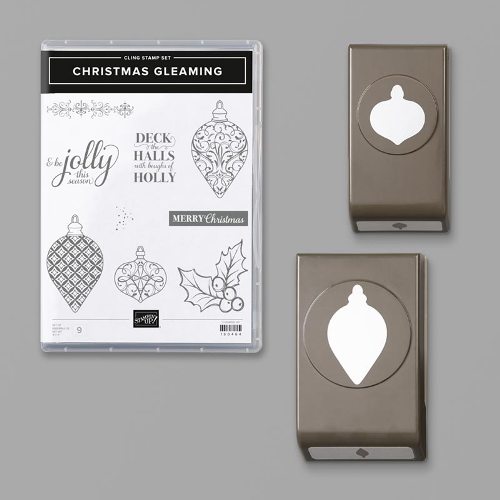
You need to place your order before January 2, 2020. All you have to do is go to my shopping page at TheIslandStamper.stampinup.net and add this great stamp & punch set to your cart. You might want to get some of the Designer Series Paper too!

Until next time my friends,

Enjoy the SUnshine!

Joan 🙂

Handmade Christmas Card Ideas

Hello My Crafty Friends,

I am having so much fun creating Christmas Cards with all of the supplies that I shared with you the other day.

If you have alot of cards to make this year and want to make it look like you spent hours making each card, when it only took a few minutes, then this is the card you need to make.

I just love making 3 dimensional cards.  It’s amazing how just one pop dot can change the entire look of a card, and when you use more it makes it even better 🙂  Having 3 dimensional card ideas then actually making your idea into a beautiful Christmas card is such a gratifying feeling

Also, for another kind of look, I stamped and punched 4 ornament images.  Then folded 3 of them in half, glued the sides together and then glued them to the image that wasn’t folded and this ornament is now popping off the card!

Come back for a visit soon to see more Christmas Card Ideas, until then…

Make It A Great Day & Don’t Forget to Leave Time To Craft!

Cricut Card Idea for Easy Christmas Cards Using The Cricut Cartridge Christmas

12 Days of Christmas with Joans Craft World

On the fourth day of Christmas…

Handmade Christmas Cards do not have to be hard to make.  As a matter of fact this card was so simple to make but came out really good.

All I used for create this Christmas card was black cardstock, white glitter paper from doodlebug design, inc, and some greeting cards that I purchased with a background design already printed on the front.

I used my Cricut Expression machine to cut the images.  The sparkly moon was made using the circle image from Mini Monograms Cricut cartridge, and Santa with his sleigh and reindeer from Christmas solutions cartridge.  I put the moon on the card using the pink ATG gun and then for the Santa I used a Zig 2 way glue pen since it is really delicate and I think a tape runner would have definitely torn the paper.

That’s it.  I’m done and it looks perfect!

christmasnoelcricutcartridge

Make it a Great Day and don’t forget to leave time to Craft!

Christmas Cards Using Cuttlebug Embossing Folders & Stampin’Up Stamps

12 Days of Christmas with Joans Craft World

On the first Day of Christmas…

Making handmade Christmas Cards and Christmas Crafts while listening to Christmas Carols, does it getter better then this?  This year I wanted to make different kinds of Christmas Cards, what I mean is not all the same.  So for my first 12 cards I used a stamp set from Stampin’ Up that I got years ago.  I stamped the image using tuxedo black memento ink and colored in the design with Copic sketch markers.  I had some A2 cards that I purchased at Michaels that had such small wintry prints in soft blue and purple colors that I decided to use them.

For the inside sentiment I used a Merry Christmas stamp  from Uptown Rubber Stamp.

Of course that could have been all I needed to complete this Christmas card, but I had to add something else.  I decided what better then to layer cardstock.  I used my Cuttlebug with embossing folders. One layer was with a Snowflakes and the other layer with Swiss dots.  These embossing folders did the trick.  I then put them all together using my pink ATG adhesive gun.

Look how cute my first dozen Christmas Cards turned out.

christmascardscuttlebugstampinupcopic

Make it a Great Day and don’t forget to leave time to Craft!

A Helpful Tip to my Fellow Crafters about Handmade Address Labels for Christmas Cards

I did something yesterday that helped me out of a pinch.  I was writing out our Christmas cards and found out that I had no return address labels (or should I say ones that I would want to put on my really pretty cards), so I made my own.

I used plain white printer/copy paper. Then using my computer, Microsoft Word, along with the envelopes and labels feature I typed our return address.

Then I found a cute picture on clip art of a Christmas tree and added that to my labels.

They printed out on the piece of paper just as they would if I used a sheet of plain white labels (that I did not have)

Now here comes “let’s use stuff in your craft studio that you haven’t used in awhile.”

I trimmed each row of addresses so that there was no excess paper on either side. (Using my EK Success Cutterpede paper cutter)

Then I ran them through my XYRON 510 sticker maker using the permanent adhesive cartridge.

After taking off the top layer (clear plastic) I used my Mini Cutterpede (I could have used the big one but I have a mini and it was just was just easier) but this time using the perforation blade (I think this is the first time I every used this blade).  So that I would be able to just take one label at a time.

It worked great – looks great and the best part it was easy.

tipofthedayreturnaddresslabels

Make it a Great Day and don’t forget to leave time to Craft!