3 Cheers For A Happy Birthday

Hello My Fellow Crafters,

Birthday cards are really fun to make, especially when you have the perfect stamps and cardstock.  This card was made for my brother-in-law’s birthday.  Its always harder for me to make masculine cards, but I think this one came out pretty good.

3 cheers to you cardI really like how crisp the colors look when I put the black layer onto the colored cardstock.  This card was super easy to make once I got started 🙂

~Happy Birthday Harry ~

Make It A Great Day and Don’t Forget To Leave Time To Craft!

Happy 1st Birthday Step Up Card

Hello My Fellow Crafters,

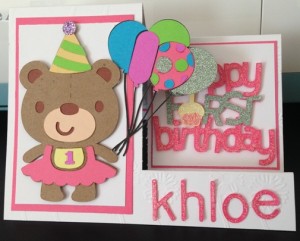
I had so much fun making this birthday card for our great nieces 1st Birthday.

happy birthday

This Cricut Explore Air machine is the BEST and using the Design Space to create these fun looking cards is so much easier then I expected (since I am really not a computer person) 🙂

I also used the Cuttlebug with an embossing folder to get the flower image onto the white cardstock.

There are so many great things about the Cricut Explore and Design space but what I have noticed is that I am not wasting paper anymore. I know exactly where everything is going to cut on the cutting mat because your computer screen shows what piece of the image is going to cut next.  I think that’s SUPER COOL 🙂

Make It A Great Day and Don’t Forget To Leave Time To Craft!


Handstamped Make A Wish Birthday Card

Hello My Fellow Crafters,

Did you ever make a card that you can’t wait to send?  Well I just did and I hope my niece Nicole likes it as much as I had fun making it for her.

handmadebirthdaywishes

I used Work Shops on the Go, Blossom Card Making Kit from Close To My Heart to make this card.  In this kit there are two stamps that have a design that looks to me like a piece of washi tape. Well, I love washi tape and have ALOT of it, so I decided to use that instead.  I think it turned out even better then if I used the stamps.  That’s why we make handmade cards, so we can create and make our own original works of art 🙂

For added dimension I wrapped the washi tape around pieces of cardstock, so it really popped off the card.  When I was done with the front of this card it looked great but it needed something, so I took a sponge dabber and lightly put the same color watermelon ink used in the word Wish and brushed the edges of the card.  It really added the perfect touch.

Now for the inside.  I used the stamp that came with the kit but added some stickles for some “bling” and to really make it look fun!

insidesentimenthandmadecard

~ Happy Birthday Nicole ~

Make It A Great Day and Don’t Forget To Leave Time To Craft!

A Simple Birthday Card That Looks Great!

Hello My Fellow Crafters,

It has been a busy time in my craft room making all kinds of cards, but I love this kind of busy 🙂

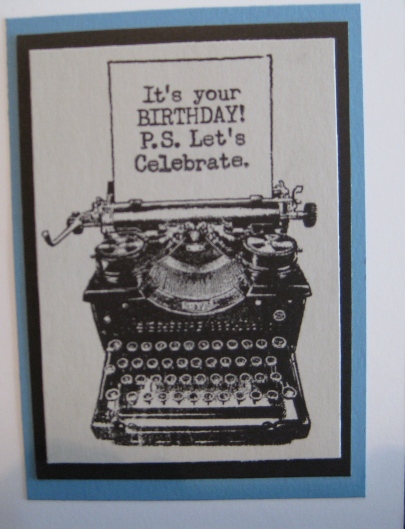
Today I want to share with you a birthday card that I made for our nephew.  And to be honest I really want to make a simple card, but just because its simple doesn’t mean it will not look good.

ctmhstampofthe month


I used the April Stamp of the Month stamp set from Close to my Heart.  A really great thing that Close To My Heart does is every month they have a stamp special.  If you spend $50.00 you can purchase the stamp of the month for just $5.00, otherwise you can purchase it anytime for $17.95 USD.  I know that the catalog that I have ends this month, so not sure what’s in the new idea book.

This stamp set is called Typed Note #S1504  and it comes in a set of 19 stamps.  If you want to order this stamp set just click on the link and it will take you to my friend Kim’s Close To My Heart website 🙂

Ok back to the card.  I stamped the typewrite and the sentiment that goes inside the “paper” with the Close to my Heart Archival Black Exclusive Ink #44751 on white cardstock and then just layered that image on two layers of colored cardstock.  This was simple, but I think it turned out great.

~ Happy Birthday Luke ~

Make It A Great Day and Don’t Forget To Leave Time To Craft!


Cuttlebug Birthday Card

Hello My Fellow Crafters,

This is a busy month for Birthdays in our family and I have to also make some cards for birthdays that were last month (sorry Luke and Riley)  So I really have to be creative and not make the same card over and over.  I am loving this bakers twine, it adds such a perfect accent to all kinds of creations 🙂

2014 rileys birthday card

Using Memento tuxedo place ink I stamped the image of the flower twice, since I wanted to use a pop dot for a layered look.  Colored the flower with Copic sketch markers, and added some Stickles for the extra shimmer.

Then took out the Cuttlebug and cut the green cardstock using a Framelit Labels die from Sizzix.   Added some bakers twine by just wrapping around the paper and tied a knot.  Put the pop dot on top of the knot and added the stamped flower.

The card just needed more, so again I used the Cuttlebug but this time used an embossing folder of Big Dots, and craft cardstock.  I still needed to stamp happy birthday someplace, and I found some metal frames in a container with some rhinestone brads. This wound be perfect.  Since the brads went in the back of the Big Dot embossed cardstock I put another layer of cardstock behind so it wouldn’t tear the white base card.

The great thing about using a Cuttlebug is that you can cut images with thin metal dies (Framelits) and also emboss with all of the embossing folders on the market.

Thanks for stopping by today.  Hope this birthday card gives you some good ideas when you are making your own handmade greeting card.

~ Happy Birthday Riley ~

Make It A Great Day and Don’t Forget To Leave Time To Craft!

Page 2 of 5
1 2 3 4 5