Using Craft Stamps and Some Fun Rubber Stamping Techniques to Make a Handmade Greeting Card

It’s been a while since I made a greeting card with my craft stamps.  I have been using my Cricut Expression machine to make my greeting cards lately and I wanted to go back and use some of my craft rubber stamps that I have, and boy do I have craft stamps.  One day I will post some pictures of all the craft stamps that I have.

Anyway, for this birthday card I wanted to share with you first of all a really cute craft stamps, some cool rubber stamping techniques and all this while I am making a birthday card for my father-in-law.  When he was at my home in March, I took him to his first ever craft rubber stamps convention.  He couldn’t believe how many different craft stamps they had as well as how many ladies were all in one convention center.  It was great and where we found some special craft rubber stamps, so I thought I would show him what I can create using some rubber stamping techniques that I have learned over the years.

I just love craft stamps that pertain to cats, and this particular craft stamp reminds me of my cat Tapioca.  He is so cute.

dadsbdaybig50

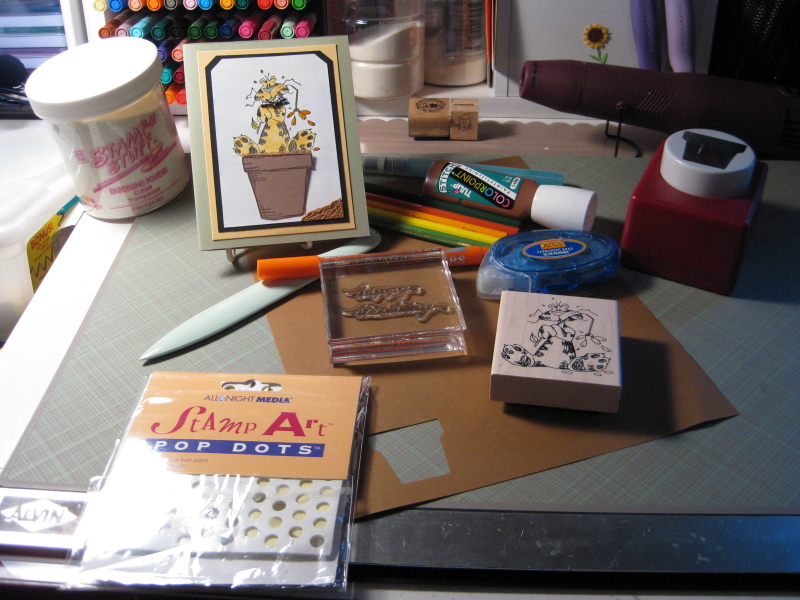
What you will need:

Cat craft stamps (Stamps by Judith)
Sentiment – Happy Birthday ~ Perfectly Clear craft stamps (Stampendous)
StazOn Black Solvent Ink Pad
Watercolor pencils (Loew-Cornell)
Water Brush
Flower Pot paper punch (Emaginations)
Paper from Stampin’ Up:  Really Rust, Sage Shadow, Barely Banana, and Basic Black.  I have no clue where I got the white card stock from.
Adhesive pop dots and tape runner

dadsbdaysupplies50

How to make it:

First I cut all the card stock listed above to get the layered look that I wanted for this card.
Then I stamped the cat craft stamps image with my Black StazOn ink pad.  I then put embossing powder on the wet ink and heat set.

The reason why I used the solvent ink and embossed is that I am now going to use my watercolor pencils to color in the image and I did not want the black ink to run into the colors.

I used watercolor pencils along with my water brush, to color the cat and the stem and leaf.  I then used another of my great rubber stamping techniques and that was to color the flower with an embossing marker and then put on the embossing powder.  Using my heat gun I then made the flower have a shiny finish.

I punched out of brown paper the flower pot.  I put the pop dots only at the rim of the flower pot, and then used my tape runner for the bottom of the flower pot.  I wanted to give a three dimensional look like the cat was really sitting in the flower pot.

I then used Tulip Color Point Stitch paint to make the dirt.  I really got inside the rim to get the effect that the cat was in the pot.  I again used my heat gun to set the paint and give it the uneven puffy look.  (When I was cleaning my craft closet a few months back I came across all of these Tulip paints and all of my craft stamps and I wanted to start using them for fun projects like this one).

For the inside I used one of my Perfectly Clear craft stamps and stamped Happy Birthday.  Nice and simple.

I almost forgot, I finished him off with a little black and white ribbon that I tied around his neck, for a fun look for my cat.

I hope he like the card, since I used the craft stamps that we bought together. I sure had a lot of fun making it.  I think now that I had so much fun with this card that I will start using more from the collection of my craft stamps for upcoming birthdays and holidays.  Hope you enjoyed it too!

Make it a Great Day and don’t forget to leave time to Craft!

A Cricut Project Using the Hello Kitty Greetings Cricut Cartridge

I needed to make a birthday card for my niece Nicole.  She really loves cats, so I decided to use my Hello Kitty Greetings Cricut Cartridge for her card.  There was so many cute kitty’s to choose from, but I decided to use the one with the balloons so that I could Rubber Stamp some sentiments on.

I cut the Hello Kitty on my Cricut Expression Machine.  I set my size to 5″, and you can see it was the perfect size.  I added some happy birthday wishes and a candle and present with “perfectly clear stamps” and black color box pigment ink.  I also used Star Dust Stickles around the bow and clothing  for a little sparkle.

hellokittycard50

Make it a Great Day and don’t forget to leave time to Craft!

Another Cricut Card Idea ~ Making a Dollhouse Card using the Wild Card Cricut Cartridge

Ya gotta love the Cricut Expression machine.  I had to make a birthday card for my niece.  I knew that she was making a dollhouse with her mom, so I wanted to make this handmade greeting card special.  After finding out her colors that they were painting the dollhouse, I decided to use the same colors for the handmade card.

Using my Cricut Expression and the Wild Card Cricut Cartridge was the perfect choice for my cricut card idea.  All of the samples showed this Wild Card Cricut Cartridge being used for moving/change of address, but I decided to make it a dollhouse instead.

I set my Cricut Expression to cut the card at 7″ and it was a great size since I wanted to embellish this handmade greeting card with some cute card and scrapbooking embellishments that I have.

I used a pink rhinestone for the door handle, I had a 3D EK Success sticker of a white picket fence that I cut down to size and also some fun stickers of palm trees to accent the front door.  I finished it with a pink butterfly 3D sticker again from EK Success.

For the inside I went trough all of the rubber stamps that I have (and that’s a lot of rubber stamps, good thing that I have my rubber stamping supplies organized in containers that are labeled) but what I decided was to make the inside of this handmade greeting card very simple and just used a rubber stamp that said Happy Birthday.

dollhousecard001500

I love the way that it turned out.

Wishing Riley a Very Happy Birthday!

Make it a Great Day and don’t forget to leave time to Craft!

How To Use The Wild Card Cricut Cartridge To Make A Custom Graduation Card

Using the Wild Card Cricut Cartridge

I needed to make a Graduation Card. I looked through all my cartridges and decided to use the Wild Card since it had the best graduation cap. The only thing that I added was making some fringe cuts on the tassel to look like a “real tassel”.

Then after I cut the envelope, I just added the graduates name to the front

The card was cut at 6 inches, and the envelope at 6 ½ inches only because I did not want the tassel to get messed up.

How cool is this card and envelope?

graduationcard500

Make it a Great Day and Don’t Forget to Leave Time to Craft!

Using the Cricut Expression Machine with the Animal Kingdom Cricut Cartridge

I needed to make a birthday card for a friend who is turning 60. I wanted to create a custom handmade card that would be fairly special. I was determined to use my cricut expression to help me do this. As I went through the various cricut cartridges I had in my supplies, I came across the animal kingdom cricut cartridge and thought that would work just fine for me. Let me share with you what I ended up doing.

What you’ll need:

cardstepssupplies2Cardstock: Hobby Lobby patterned paper and solid brown and beige paper from World Win Papers, Die cut machine: Cricut Expression, Cricut cartridge: Animal Kingdom Cricut Cartridge for Owls and the word Whooo,: Plantin Schoolbook for the numbers 6, 0 and the letter’s, Little Greetings from hero Arts 3×6 card with envelope, All Night Media mini Pop Dots, Zig 2 way glue, K&Company permanent tape runner, Zig Memory System chocolate colored marker, and Rhinestones that I had in a jar.

How to make it:

I started with a neutral card base. Cut a strip of the patterned paper and adhered to the card with tape runner.

cardsteps2

Placed the paper on the Cricut cutting mat as shown in the picture and loaded paper into my Cricut Expression. I selected the size that I wanted to cut out the images. For the words and numbers I used size 1 ¼”, Owls were cut to 1 ¾” and 1 ¼”. Pressed the image that I wanted on the keypad and then the Cut button to start cutting.

cardsteps3

When the cutting has stopped, press the unload paper key. Using my spatula tool I removed the images from the cricut cutting mat.

cardsteps4

Wanting a stitched look I used my Zig marker and went around the letters and numbers making little dashes, then using my pop dots and glue stick, I put the images to the patterned paper, and then added rhinestones for the eyes.

cardsteps61

I was pleased the way it turned out and I know that he will not be getting a duplicate of this card. It is a one-of-a-kind Joan’s Craft World creation.

Make it a Great Day and don’t forget to leave time to Craft!

Page 27 of 30
1 25 26 27 28 29 30