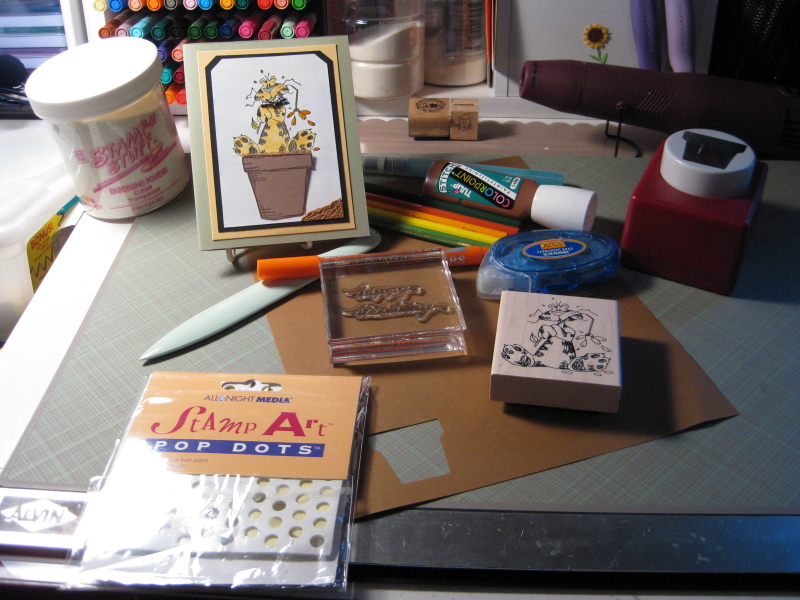
It’s been a while since I made a greeting card with my craft stamps. I have been using my Cricut Expression machine to make my greeting cards lately and I wanted to go back and use some of my craft rubber stamps that I have, and boy do I have craft stamps. One day I will post some pictures of all the craft stamps that I have.
Anyway, for this birthday card I wanted to share with you first of all a really cute craft stamps, some cool rubber stamping techniques and all this while I am making a birthday card for my father-in-law. When he was at my home in March, I took him to his first ever craft rubber stamps convention. He couldn’t believe how many different craft stamps they had as well as how many ladies were all in one convention center. It was great and where we found some special craft rubber stamps, so I thought I would show him what I can create using some rubber stamping techniques that I have learned over the years.
I just love craft stamps that pertain to cats, and this particular craft stamp reminds me of my cat Tapioca. He is so cute.

What you will need:
Cat craft stamps (Stamps by Judith)
Sentiment – Happy Birthday ~ Perfectly Clear craft stamps (Stampendous)
StazOn Black Solvent Ink Pad
Watercolor pencils (Loew-Cornell)
Water Brush
Flower Pot paper punch (Emaginations)
Paper from Stampin’ Up: Really Rust, Sage Shadow, Barely Banana, and Basic Black. I have no clue where I got the white card stock from.
Adhesive pop dots and tape runner

How to make it:
First I cut all the card stock listed above to get the layered look that I wanted for this card.
Then I stamped the cat craft stamps image with my Black StazOn ink pad. I then put embossing powder on the wet ink and heat set.
The reason why I used the solvent ink and embossed is that I am now going to use my watercolor pencils to color in the image and I did not want the black ink to run into the colors.
I used watercolor pencils along with my water brush, to color the cat and the stem and leaf. I then used another of my great rubber stamping techniques and that was to color the flower with an embossing marker and then put on the embossing powder. Using my heat gun I then made the flower have a shiny finish.
I punched out of brown paper the flower pot. I put the pop dots only at the rim of the flower pot, and then used my tape runner for the bottom of the flower pot. I wanted to give a three dimensional look like the cat was really sitting in the flower pot.
I then used Tulip Color Point Stitch paint to make the dirt. I really got inside the rim to get the effect that the cat was in the pot. I again used my heat gun to set the paint and give it the uneven puffy look. (When I was cleaning my craft closet a few months back I came across all of these Tulip paints and all of my craft stamps and I wanted to start using them for fun projects like this one).
For the inside I used one of my Perfectly Clear craft stamps and stamped Happy Birthday. Nice and simple.
I almost forgot, I finished him off with a little black and white ribbon that I tied around his neck, for a fun look for my cat.
I hope he like the card, since I used the craft stamps that we bought together. I sure had a lot of fun making it. I think now that I had so much fun with this card that I will start using more from the collection of my craft stamps for upcoming birthdays and holidays. Hope you enjoyed it too!
Make it a Great Day and don’t forget to leave time to Craft!


