JoansCraftWorld now Donating Cards for a Cause called Operation Write Home

I found this website that I think is the most heart felt site that I have seen. It is called Operation Write Home.  It is an organization that takes handmade cards that we the card makers make and send them to our troops, so that they can write to their family and loved ones at home.  They recently changed their name from Cards for Heroes.

When I went to the site and saw the pictures of our military men and women holding up cards from “us” with such smiles on there faces, it really touched me like never before.  I guess I have been in my little world enjoying my freedom, but not remembering why I am free.  It’s because of all of our military out there in the middle of nowhere or should I say “hell” fighting for my and our freedom.
It might sound crazy but now I feel that I have a small part in helping them connect with there families by being part of Operation Write Home.

operationwritehome

I am in the process of making a lot of cards to send to Operation Write Home so they in return can mail them out to our troops.  And I am going to say this to all of you so you can hold me accountable, I will continue to make/send cards till all of our troops are safely home with there families.  There I said it and now I have to do it.  And it’s not like I don’t like making cards, that is my passion and now my passion has a cause behind it.

So you may be asking yourself, why is Joan writing about this? Because if you are a card maker like me and want to help our soldiers stay connected with there families and loved ones, take part in this great cause.  Remember, there are no Hallmark stores for them to get a card.  Consider yourself the piece of the puzzle that get our soldiers connected to home.

Go and visit the site now, and get all the details.  I hope you feel as good as I do, and join in on this wonderful good deed and help send Cards for Heroes.

What Stamp Ink & Stamp Pads Should Be Used For Your Rubber Stamping Needs?

I received some questions regarding what kind of stamp ink and stamp pad that I use.  And it all really depends on what I am making.

Here is a picture of just some of the stamp pads and stamp ink refills that I own and use in my rubber stamping projects.

stamppadsandink50

My Stampin’ Up spots are all the dye ink classic stamp pads and the larger ones are the pigment craft stamp pads.  I also have a few Versa Color dot ink pads also, which are pigment ink.  If I showed them all to you there would be a huge pile so I just wanted to show you that I have them both.

There are several differences. Dye stamp ink absorbs into the paper where as pigment stamp ink sits on top of the paper and does not absorb. Pigment stamp ink tends to be thicker than dye stamp ink and is often preferred for scrapbooking because pigment stamp inks are more resistant to fading than most dye stamp inks.

Just remember that I am not a stamp ink expert, these are just the facts about ink.
Dye Ink (Classic Stamp Ink)
•    Dries quickly – you should be able to stamp your image and run your hand over it within moments and not have smearing
•    Wonderful for making handmade greeting cards
•    Not as expensive as the Craft Pigment Ink
•    No matter what color you use, you will not see more than a watermark if you stamp a light color ink onto dark paper.
Pigment Ink (Craft Stamp Ink)
•    Does NOT dry quickly – will smear if not heat set or let dry for a few minutes.
•    Recommend above classic ink for scrapbooking because it won’t fade.
•    This is the perfect ink if you are embossing, since it does stay wet longer your embossing powders sticks to it perfectly for you to heat set with your heat gun.
•    You can use a light color ink to stamp on dark paper and see the image well.  This adds a whole new world of things you can do!
The one I tend to use the most when doing my rubber stamping is probably the Craft Pigment ink.  I am a custom greeting card maker and love to emboss, so this is the perfect stamp ink for me.
I can also say that I have a few favorite manufacturers of stamp ink and stamp pads.  I love Stampin’ Up because they have various stamp inks & stamp pads in both dye and pigment inks and that match there papers.  My other favorite is Color Box, I think mainly because they are sold in my local crafting stores and are easily obtainable when needed.
Now this is just me but I also like the Craft Pigment Stamp Pads because they are made of a soft foam and when rubber stamping, I feel that I get better ink distribution than when I use the Dye Stamp pads that are made of a hard surface, that doesn’t budge.
If you have further questions just leave a comment!

Make it a Great Day and Don’t Forget to Leave Time to Craft!

Using Craft Stamps and Some Fun Rubber Stamping Techniques to Make a Handmade Greeting Card

It’s been a while since I made a greeting card with my craft stamps.  I have been using my Cricut Expression machine to make my greeting cards lately and I wanted to go back and use some of my craft rubber stamps that I have, and boy do I have craft stamps.  One day I will post some pictures of all the craft stamps that I have.

Anyway, for this birthday card I wanted to share with you first of all a really cute craft stamps, some cool rubber stamping techniques and all this while I am making a birthday card for my father-in-law.  When he was at my home in March, I took him to his first ever craft rubber stamps convention.  He couldn’t believe how many different craft stamps they had as well as how many ladies were all in one convention center.  It was great and where we found some special craft rubber stamps, so I thought I would show him what I can create using some rubber stamping techniques that I have learned over the years.

I just love craft stamps that pertain to cats, and this particular craft stamp reminds me of my cat Tapioca.  He is so cute.

dadsbdaybig50

What you will need:

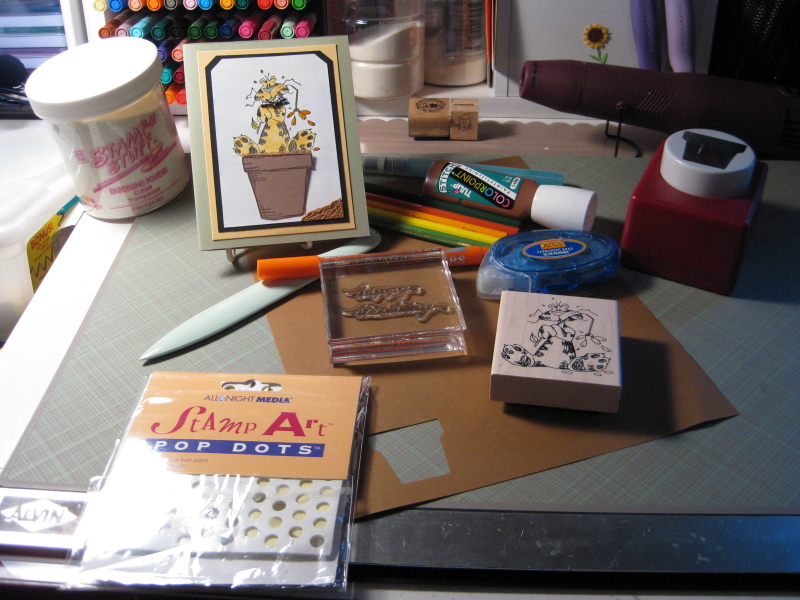
Cat craft stamps (Stamps by Judith)
Sentiment – Happy Birthday ~ Perfectly Clear craft stamps (Stampendous)
StazOn Black Solvent Ink Pad
Watercolor pencils (Loew-Cornell)
Water Brush
Flower Pot paper punch (Emaginations)
Paper from Stampin’ Up:  Really Rust, Sage Shadow, Barely Banana, and Basic Black.  I have no clue where I got the white card stock from.
Adhesive pop dots and tape runner

dadsbdaysupplies50

How to make it:

First I cut all the card stock listed above to get the layered look that I wanted for this card.
Then I stamped the cat craft stamps image with my Black StazOn ink pad.  I then put embossing powder on the wet ink and heat set.

The reason why I used the solvent ink and embossed is that I am now going to use my watercolor pencils to color in the image and I did not want the black ink to run into the colors.

I used watercolor pencils along with my water brush, to color the cat and the stem and leaf.  I then used another of my great rubber stamping techniques and that was to color the flower with an embossing marker and then put on the embossing powder.  Using my heat gun I then made the flower have a shiny finish.

I punched out of brown paper the flower pot.  I put the pop dots only at the rim of the flower pot, and then used my tape runner for the bottom of the flower pot.  I wanted to give a three dimensional look like the cat was really sitting in the flower pot.

I then used Tulip Color Point Stitch paint to make the dirt.  I really got inside the rim to get the effect that the cat was in the pot.  I again used my heat gun to set the paint and give it the uneven puffy look.  (When I was cleaning my craft closet a few months back I came across all of these Tulip paints and all of my craft stamps and I wanted to start using them for fun projects like this one).

For the inside I used one of my Perfectly Clear craft stamps and stamped Happy Birthday.  Nice and simple.

I almost forgot, I finished him off with a little black and white ribbon that I tied around his neck, for a fun look for my cat.

I hope he like the card, since I used the craft stamps that we bought together. I sure had a lot of fun making it.  I think now that I had so much fun with this card that I will start using more from the collection of my craft stamps for upcoming birthdays and holidays.  Hope you enjoyed it too!

Make it a Great Day and don’t forget to leave time to Craft!

A Cricut Project Using the Hello Kitty Greetings Cricut Cartridge

I needed to make a birthday card for my niece Nicole.  She really loves cats, so I decided to use my Hello Kitty Greetings Cricut Cartridge for her card.  There was so many cute kitty’s to choose from, but I decided to use the one with the balloons so that I could Rubber Stamp some sentiments on.

I cut the Hello Kitty on my Cricut Expression Machine.  I set my size to 5″, and you can see it was the perfect size.  I added some happy birthday wishes and a candle and present with “perfectly clear stamps” and black color box pigment ink.  I also used Star Dust Stickles around the bow and clothing  for a little sparkle.

hellokittycard50

Make it a Great Day and don’t forget to leave time to Craft!

Another Cricut Card Idea ~ Making a Dollhouse Card using the Wild Card Cricut Cartridge

Ya gotta love the Cricut Expression machine.  I had to make a birthday card for my niece.  I knew that she was making a dollhouse with her mom, so I wanted to make this handmade greeting card special.  After finding out her colors that they were painting the dollhouse, I decided to use the same colors for the handmade card.

Using my Cricut Expression and the Wild Card Cricut Cartridge was the perfect choice for my cricut card idea.  All of the samples showed this Wild Card Cricut Cartridge being used for moving/change of address, but I decided to make it a dollhouse instead.

I set my Cricut Expression to cut the card at 7″ and it was a great size since I wanted to embellish this handmade greeting card with some cute card and scrapbooking embellishments that I have.

I used a pink rhinestone for the door handle, I had a 3D EK Success sticker of a white picket fence that I cut down to size and also some fun stickers of palm trees to accent the front door.  I finished it with a pink butterfly 3D sticker again from EK Success.

For the inside I went trough all of the rubber stamps that I have (and that’s a lot of rubber stamps, good thing that I have my rubber stamping supplies organized in containers that are labeled) but what I decided was to make the inside of this handmade greeting card very simple and just used a rubber stamp that said Happy Birthday.

dollhousecard001500

I love the way that it turned out.

Wishing Riley a Very Happy Birthday!

Make it a Great Day and don’t forget to leave time to Craft!

Page 26 of 30
1 24 25 26 27 28 30