Cricut Card Making Ideas Using Mini Monograms Cartridge

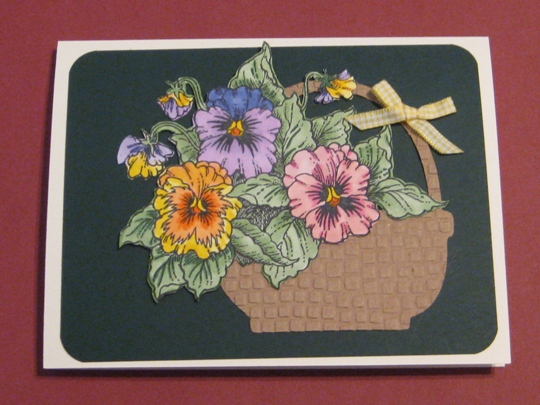
Having so many Cricut card ideas is so much fun when using the Mini Monograms Cricut Cartridge.  I also added some Penny Black Zoophabet stamps for that personalized touch.  Colored with Copic Sketch and Prismacolor markers for a clean, professional look.

Why would anyone who owns a Cricut Expression cutting machine, some rubber stamps ever purchase a greeting card from a store again.   I have not purchased a greeting card from a store in at least 12 years.  I love sending cards with my personal touch.  I think that it means so much more, since alot of thought has to be put into handmade vs store bought.  Don’t you think so?  Handmade Greeting Cards are the way to go.           So lets go and make some Cards!

Make it a Great Day and don’t forget to leave time to Craft!

How to Use Copic Markers Coloring a 3D Rubber Stamped Flower to Create a Handmade Greeting Card

I wanted to point out that many people have found this video by searching for things like use copic markers. using copic markers. copic marker tutorial. copic marker coloring. copic markers sketch. copics markers. and copic color markers. That’s because of what was entered into youtube when the video was uploaded. Becoming more familiar with this will allow you to expand your search query so you may be able to find more helpful videos and tips on other sites and blogs.

Here’s a list of the supplies you may have seen quickly flash by in my credits at the end of the video:

Copic Sketch Markers

Hero Arts Rubber Stamp Set

Memento Tuxedo Black Dye Ink Pad

EK Success Cutter Bee Scissors

Pop Up Glue Dots

White Blank Cards

Make it a Great Day and Don’t forget to Leave Time to Craft!

Handmade Valentines Day Cards for Operation Write Home

A Very Happy New Year to all of my Fellow Crafters.  2010 is going to be a lot of Fun.

I just finished making some Valentines Day Cards for Operation Write Home and got them in the mail.

valentinecardsforoperationwritehome

If any of you do not know about Operation Write Home, you are really missing out on great organization that you can be a part of.  Please check them out and if you are not a card maker maybe you can send a donation. I am so honored to be part of this organization.  While our soldiers are fighting for us and our freedom, they are away from their families and this is my small part in giving back and helping them be connected to their loved ones.  Just check out the web site and see for yourself.

Anyway, now I am making my first Joans Craft World video.  Some of our fellow crafty friends make it look so easy.  Well let me tell you I think, no I don’t think, I know that I really need to practice.  I thought I did a great take only to find out that all you could see on the screen was my hands and a white piece of paper, and not what I was doing.  Oh well, I guess that is the learning curve of making videos.  I just need to finish editing and then it will be up for all to see.

Make it a Great Day and don’t forget to leave time to Craft!

Joans Craft World 2009 Handmade Christmas Card

What do you get when you have a Cuttlebug, Cuttlebug Embossing Folders, Martha Stewart Paper Punch, Stickles, Ribbon, White Cardstock, Strip of colored cardstock and a rubber stamp?

2009handmadechristmascardsupplies

Our 2009 Handmade Christmas Card!

I can share our card with you because they are all out in the mail.  For my family and friends who follow JoansCraftWorld, hopefully they will have already received our Christmas card.

I have been making our Christmas Cards since for a few months now and since I make around 75-100 cards, I need to have a system.  Usually I make cards that are layered (of course, more work) but I love the way that they look.  So my card this year has 5 layers on the outside, a Christmas saying on the inside, and my holiday signature on the back.

One layer is a one inch cut piece of colored cardstock. (the Paper Studio)

One is a border punch (Martha Stewart Frosty Village Edge punch)

Two are embossed using my Cuttlebug (Swiss Dots and Snowflakes Embossing folders)

And the last one is rubber stamped with an added ribbon embellishment. (Hero Arts)

Oh I forgot to tell you that three of the layers are hand ripped or some people call it hand torn cardstock, for a really cool look.

And to finish each card I added stickles for that special “bling” (Stickles –  Star Dust & Diamonds)

2009handmadechristmascard

Wishing all of my Fellow Crafters a Very Merry Christmas and a Fantastic New Year!

Make it a Great Day and don’t forget to leave time to Craft!

What Can You Make Using The Plantin Schoolbook Cricut Cartridge, A Cricut Expression Cutting Machine And The New Cricut Gypsy?

The answer is a really cool birthday card.

The Plantin Schoolbook Cricut cartridge is what I used to make a birthday card for my nephew Ryan who is turning 13.  I had to make something “cool” and not cute since he is now a teenager.  His parents (my sister) got him a digital camera and I wanted to keep that theme for his card.  So I looked at all my cricut cartridges and wouldn’t you know it, I didn’t have any of the cartridges that have an image of a camera.  Guess I need to make another wish list.

So I looked though all of my rubber stamps and if you have followed my blog, you know that I have stamps.  And I was in luck.  I have a stamp of a camera from a company called scrapbookin’ stamps that is no longer in business.

So I stamped the camera on silver paper (his camera is silver) and used black pigment ink and clear embossing powder to set the ink.

Then I used a circle paper punch and I was in luck, it was the correct size to punch the lens out of the camera.  I also punched a circle in the blue paper that I mounted the camera onto, and also the white card cover.  I rounded the corners of the blue paper so they matched the rounded edges of the camera.

usingplantinschoolbookcricutcartridgetomakehandmadegreetingcard

I then took out my Cricut Gypsy and looked though the cartridges and chose the Plantin Schoolbook cricut cartridge to cut out the letters and numbers for this card.  I really like the Roly Poly feature for this.  I used my Cricut Expression cutting machine to cut these out.  After I cut out Ryan’s name and the numbers 13, I wanted to add just a little “bling” to them so I used a silver gelly pen and outlined them with dots.  I think it turned out pretty cool.

messageinsidehandmadegreetingcardusing cricutcartridge

Did I forget to tell you how much I love my new Cricut Gypsy!

I used my permanent adhesive glue glider to put Ryan’s name down then I used dimensional adhesive dots for the 13 because I wanted it to pop out of the camera.  Remember, I cut the hole so that when he opens the card the 13 will be in the inside of the card also.

Wishing Ryan a Fantastic 13th Birthday ~ Wish we could be there to celebrate!

Make it a Great Day and don’t forget to leave time to Craft!

Page 24 of 30
1 22 23 24 25 26 30