2008 Christmas Card

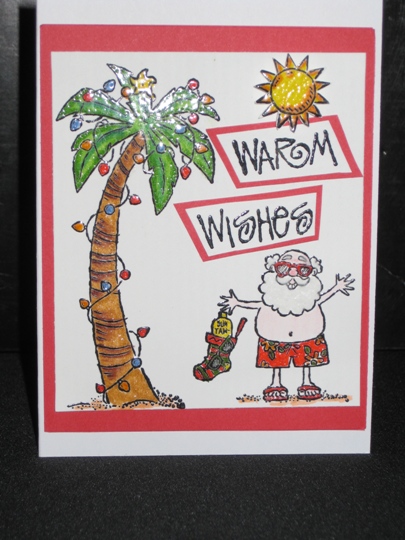
Well, I’m all done with all of my 70 hand stamped Christmas Cards. I went to the post office this afternoon to mail them all. So now it is safe for me to show you my 2008 Christmas card.

handmadechristmascardwithstampinupstamps

The stamps that I used are from Stampin’ Up!   Santa’s beard is fluffy. I used white flocking powder. It feels velvety soft. The sun is applied to the card with a round adhesive dot for dimension. All the coloring in was done with Marvy embossing pens and stamp-n-stuff clear embossing powder.

Wishing everyone a very Merry Christmas and a Fantastic 2009!

Back to my Handmade Custom Christmas Cards

Back in September I was telling you about an idea that I had for my Christmas cards this year.  Well my idea in my head sounded great, but I just couldn’t get it right on paper. So now I am really behind in my card making, but not too worry. I just finished a sample of this year’s card. It is a fun card, with a lot of color and layers. I will share my card with you in December only because if my family & friends read this blog, they will see the card that they will be receiving in the mail.  And if you like my Christmas card, you can start making them for your cards next year.

Now it’s time to talk about Cricut.

If you never heard of a Cricut, you will start hearing a lot about it from me.

I have had this personal cutting machine for a year already but am just seeing how much you can really do with it. It’s too cool.

This machine is amazing. It is great for all of those Scrapbookers out there as well as Greeting Card Makers.

After you cut an image (from whatever color paper you want it to be), you can embellish it any way YOU want, not how the craft store and manufacturers sell it to you.

So when I am done with my Christmas Cards, I will share with you all of the new creations that I will be making with my Cricut.

Make it a Great Day and don’t forget to leave time to Craft!

More Handmade Halloween Decorating Ideas

Do you need a container to put your Halloween candy in?

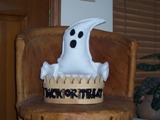
Here is a great fun basket that will also look great in any room.

You will need to purchase a basket, white felt, black felt and some fiber stuffing for filling up the ghost

I didn’t use a pattern it is all done free hand.  I know that you are a crafty person too so this will be really easy to make.

Cut (2) Ghost Shaped from your white felt

Depending on the size of your basket will determine the size of your ghost.

Using a glue gun, glue both pieces together leaving the bottom open for stuffing.

When you are done gluing and stuffing your ghost, glue the bottom closed.

Glue it to the back of your basket

Cut (2) black eyes and (1) mouth from your black felt

Glue then on the ghost and you are done.

If you like you can also cut letters out of the black felt to say Happy Halloween or Trick or Treat and then just glue then to the front of your basket.

Make it a Great Day and don’t forget to leave time to Craft!

Getting Ready for Halloween

Are you getting ready for all of the Ghost & Goblins in your neighborhood?


I just finished decorating the outside of my house with Scarecrows, and pumpkins.

And I even decorated for fall inside. Years ago I made a felt Ghost banner with sequence that I hang on the wall, along with ghosts made out of a white sheet and a Styrofoam ball for the head. I even made the felt hat. If you like the way it looks here is how you can make your own Hanging Ghost:

  1. Cut a piece of white cotton fabric into a square (you can make it any size that you like)
  2. Cut fringes on the bottom
  3. Take a Styrofoam ball and add two pieces of wire or coat hanger to the bottom of the ball (this is so that it doesn’t just hang droopy)
  4. Place the piece of fabric over the ball
  5. Then tie a piece of ribbon, raffia, or thread around his neck
  6. With a fabric marker (so it doesn’t bleed) draw his eyes and mouth
  7. If you like you can cut out of felt the word BOO and glue to his chest
  8. Add a hat made out of felt. Cut a circle for the base
  9. Then cut another circle and make into a cone shape (glue ends together)
  10. Add a ribbon to the top of the hat for hanging (glue into place)
  11. Hot glue the hat to his head
  12. And your Ghost is ready for hanging

Make it a Great Day and don’t forget to leave time to Craft!

Balloon Fiesta 2008

Here in my home town is Balloon Fiesta.  All balloonists from around the world come together for a week of the most fantastic ballooning.  We have open space and box winds.  This means that they can actually take off and land in the same place.

Picture this, waking up in the morning and looking out the window and the skies are filled with the most colorful balloons in all different shapes and sizes.  You just have to go and get your camera even though it does not do it justice.

Now that you have just seen the widest range of colors, you have no choice but go and get creative. I know that I will.

Make it a Great Day and don’t forget to leave time to Craft!

Page 1 of 7
1 2 3 7