Joans Craft World 2009 Handmade Christmas Card

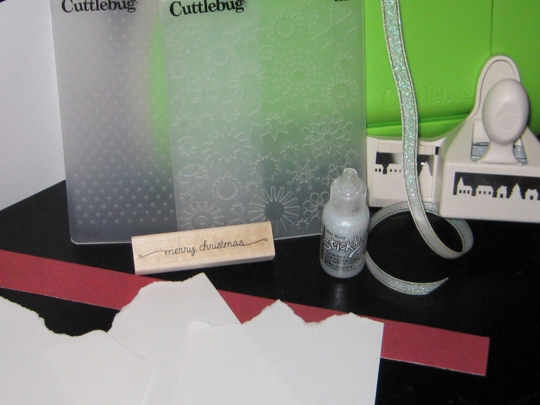
What do you get when you have a Cuttlebug, Cuttlebug Embossing Folders, Martha Stewart Paper Punch, Stickles, Ribbon, White Cardstock, Strip of colored cardstock and a rubber stamp?

2009handmadechristmascardsupplies

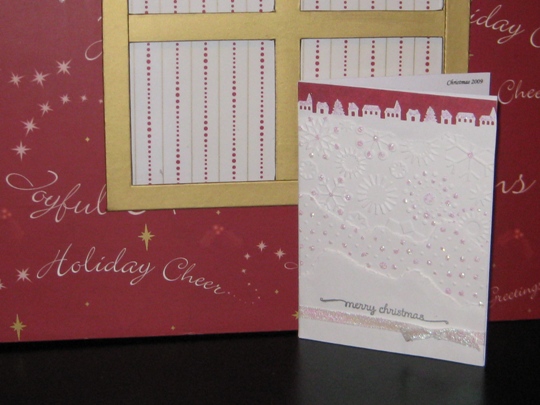
Our 2009 Handmade Christmas Card!

I can share our card with you because they are all out in the mail.  For my family and friends who follow JoansCraftWorld, hopefully they will have already received our Christmas card.

I have been making our Christmas Cards since for a few months now and since I make around 75-100 cards, I need to have a system.  Usually I make cards that are layered (of course, more work) but I love the way that they look.  So my card this year has 5 layers on the outside, a Christmas saying on the inside, and my holiday signature on the back.

One layer is a one inch cut piece of colored cardstock. (the Paper Studio)

One is a border punch (Martha Stewart Frosty Village Edge punch)

Two are embossed using my Cuttlebug (Swiss Dots and Snowflakes Embossing folders)

And the last one is rubber stamped with an added ribbon embellishment. (Hero Arts)

Oh I forgot to tell you that three of the layers are hand ripped or some people call it hand torn cardstock, for a really cool look.

And to finish each card I added stickles for that special “bling” (Stickles –  Star Dust & Diamonds)

2009handmadechristmascard

Wishing all of my Fellow Crafters a Very Merry Christmas and a Fantastic New Year!

Make it a Great Day and don’t forget to leave time to Craft!

Making a Birthday Card Using your Cricut Expression Cutting Machine with the Plantin SchoolBook cartridge and your Cuttlebug Machine too!

Here is an easy card to make that looks pretty classy too!

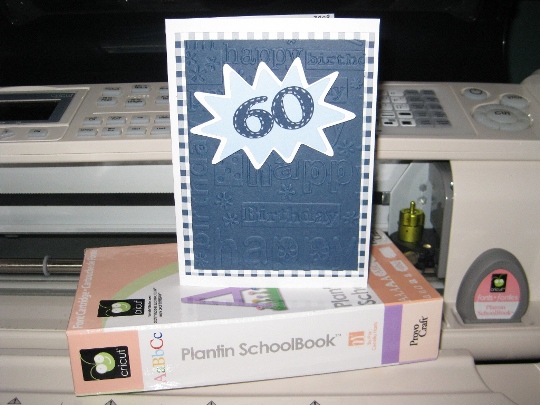
I had to make a special birthday card for our brother-in-law who was turning 60.  I went looking through all of my cartridges and nothing popped out and said this is the one.  So what I ended up doing was combining my Cricut Expression cutting machine, along with the Plantin SchoolBook cartridge and Cuttlebug machine using the happy birthday cuttlebug embossing folder for a fun card.

plantinschoolbookbirthdaycard

Here is how I made this card:

I used a white 4 x 5.5” note card.

Cut a piece of checkered paper just a little smaller than then the card.

Cut a piece of solid blue paper smaller then the checkered paper.

Now the fun part.

I ran the blue paper through my cuttlebug machine using the birthday cuttlebug embossing folder.

cuttlebugandembossingfolder

Then using my Cricut Expression cutting machine, and the Plantin SchoolBook cartridge, I cut out the numbers 60, using the “Roly Poly” feature at one inch.

Next I selected the “blast” shape from the cartridge and cut the white one at 2.5” and the light blue one at 2”

I put them all together with the Glue Glider Pro, and then I added some dimensional adhesive dots to the 60, since I wanted that to pop out of the card.  And for the finishing touch I added a stitched look on the 60 using a silver gelly roll pen.

Wishing Bruce a Wonderful 60th!

Make it a Great Day and don’t forget to leave time to Craft!

Page 4 of 4
1 2 3 4