Using Clear Rubber Stamps To Make A Handmade Birthday Card For The Coffee Lover

Making cards is so much fun! Here is a quick post of  a card that I made for my brother-in-law for his birthday.

The colors brown and light blue look so good together.

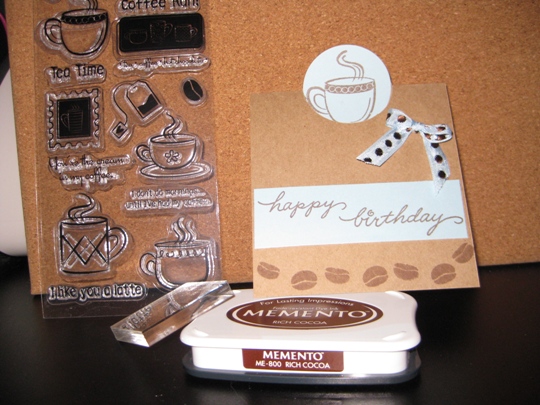
For the card base I used Kraft cardstock ~ Then using my Creative Memories circle cutter I just cut half a circle on the fold  of the card so that when it opened you would be able to see the image inside too!

The light blue cardstock from Stampin Up was used for the panel and the circle ~ Ribbon from Michael’s called dashes, dots & checks ~ Clear stamps from TPC called Coffee Cafe with an acrylic block, some memento ink and you have the perfect masculine card for a coffee lover.

handmadebirthdaycard

Wishing Harry the Best Birthday!

Make it a Great Day and don’t forget to leave time to Craft!

New Paper Folding and Layering Technique For A Handmade Birthday Card

I have always loved the way greeting cards looked when you open them up and they “pop” with excitement.  Not just your ordinary card that may have a beautiful saying but nothing special.

Well those days are over.  I have been using different folding techniques that really make your handmade greeting cards fun and exciting.  It does take a little more time then your regular card, but it is well worth it.

Tomorrow is my sister-in-laws birthday and then on Monday it’s my Mom’s birthday.  I wanted to make them both a really pretty, and different card that they would remember, so here is what the birthday card looks like. (I used the same design for them both but I changed the coloring)

This is the front of the card.  I rubber stamped the image onto white cardstock (this dragonfly stamp from Stamps Happen, Inc) the stamp was a large print but I only used the center of the design and colored with Copic Sketch markers.  Then I cut out the image and layered it onto the solid green cardstock that was layered onto the patterned paper with pop dots for a dimensional look.
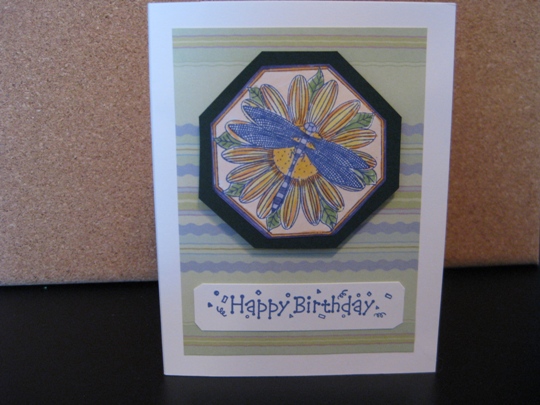
handmadebirthdaycarddragonfly

Now for fun inside of this birthday card.   I stamped some sentiments on white cardstock tags.  Then layered onto a light lavender cardstock.  I wanted to bring the theme of the dragonfly into the inside of the card so I stamped this image of a dragonfly (from Stamp Crafts)  three times and colored with Copic Sketch markers, then I cut them out using my Cutter Bee Precision tip scissors.  I finished them off by gluing them to each of the sentiment tags.
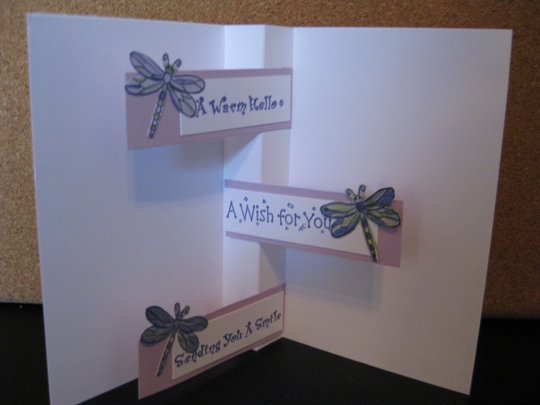
handmadebirthdaycardtagsinside

The great part about this card is that I have had these rubber stamps for years and used them one dimensional.  But with a different fold of the card and some layering, it is like having some brand new stamps all over again.

~ Wishing Lin Marie and my Mom a Wonderful Birthday ~

Make it a Great Day and don’t forget to leave time to Craft!

Making a Handmade Birthday Card Using Rubber Stamps & Cricut Expression Cutting Machine

I went to the local rubber stamp show a few weeks ago and I could not believe how much rubber was in one place LOL ~ Anyway, I got so many great ideas for card making that I just have to share a birthday card that I made.

minimonogrambirthdaycard

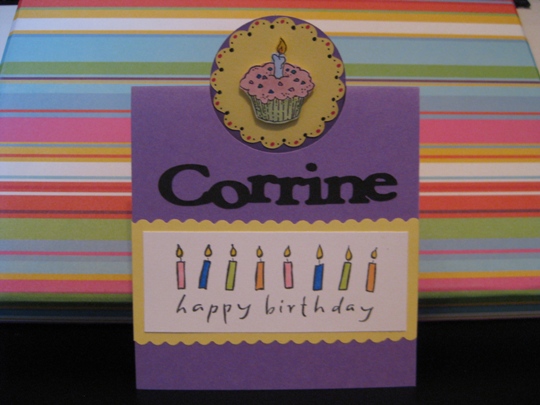
I used my Cricut Expression with the Mini Monograms Cartridge for the scalloped circle on the top.  I then stamped the cupcake with a rubber stamp from Stampendous on white cardstock using Memento tuxedo black dye ink, colored with Copic Sketch markers and then cut it out and used pop dots to adhere onto the scalloped circle.

For the happy birthday I stamped this Hero Arts stamp on white cardstock, again Memento tuxedo black ink and coloring the images Copic Sketch markers.  I went to put it onto the card and it looked “boring” so decided to layer it also.  Instead of using my Cricut Expression to cut the scalloped edge, I used Fiskars Paper Edgers scissors and got the same look. (it was also alot quicker).

Oh, I forgot to tell you.  The purple cardstock was cut using the Creative Memories Circle Cutter.  Since I only needed a half of circle cut to make this look, I couldn’t use a paper punch or my Cricut Expression, so this worked out perfect. (Yeah Creative Memories!) Then I scored the cardstock using the Martha Stewart scoring board.

When I finished this card it looked great but I wanted it to be even more special, so I took out my Cricut Gypsy and used the Plantin Schoolbook cartridge with the roly poly feature and typed the birthday girls name, welded it together, cut it out with the Cricut Expression machine and “wala” a really special personalized card.

personalizedminimonogramcricutcard

Make it a Great Day and don’t forget to leave time to Craft!

A Fun Cricut Card Idea for St. Patrick’s Day

I hope that everyone is having a nice St. Patrick’s Day today.  You don’t have to be Irish to enjoy this holiday.  I was thinking of what people do on St. Patrick’s day and this is what I came up with.

1.  Go to a Parade or watch it on television

2.  Eat Corned Beef & Cabbage

3.  Drink Green Beer

4.  Where clothing that is Green

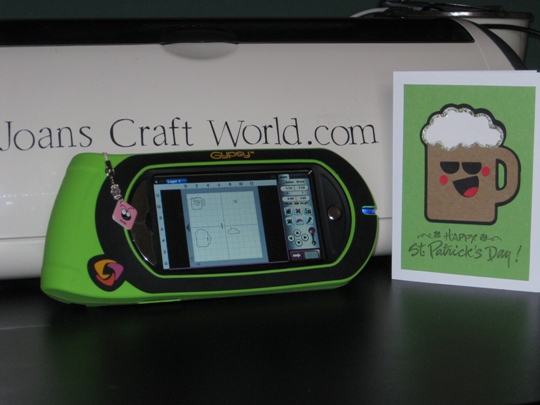
Well that is all that I can think of, anyway I found a cute Mug of Beer (or root beer) on the Smiley Cricut Cartridge and decided to make it into a Saint Patrick’s Day card.  After I set it all up on my Cricut Gypsy, I used the Cricut Expression to cut out all the pieces.

cricutsmileycardcartridgebeermug

I added some lime green Stickles to the foam of the beer, I just have to add some “bling” to this card, it makes it look so much better.  Then used a rubber stamp from PSX (Personal Stamp Exchange) with Tuxedo Black Memento Ink for the sentiment on the cover.

~ Happy St. Patrick’s Day Everyone ~

Make it a Great Day and don’t forget to leave time to Craft!

Cricut Card Idea For A Birthday Card That Will Make You Smile

My Godson’s birthday is this week and I need to make a handmade birthday card for him.  I wanted to use my Cricut Expression machine for this card.

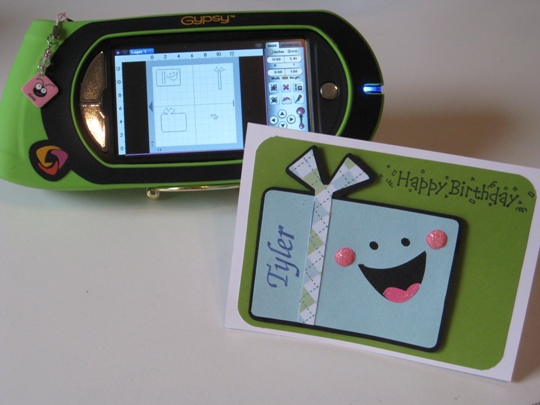
After looking though all of my Cricut Cartridges, I decided to use my Gypsy and the download cartridge called Smiley Cards.  There is an image of a present that has the cutest smiley face, and I know that it will make Tyler smile when he opens up this card.

cricutsmileycardscartridge

What I did to put some “bling” on this card was used some Stickles (cotton candy color) on the cheeks and mouth to give this smile a little shimmer.  I also used two rubber stamps.  One is from Inkadinkado with Tyler’s name and the other is the Happy Birthday rubber stamp from Hero Arts.  The ink that I used is Memento and the color is Paris Dusk (dark blue).

I just think that this cricut card idea turned out fantastic.  Making handmade greeting cards is the way to go!  Wishing Tyler a Very Happy Birthday.

Make it a Great Day and don’t forget to leave time to Craft!

Page 54 of 78
1 52 53 54 55 56 78