Making a Handmade Halloween Card Using the Cricut 3 Birds on Parade Cartridge

This is the cutest cartridge ( I say that about all of my cartridges).  I am talking about the 3 Birds on Parade Cricut Cartridge.  You don’t have to like birds to use this cartridge.

There are so many ways to dress up these birds for every occasions.  So for my first card I decided to make a Ghost, just in time for Halloween.

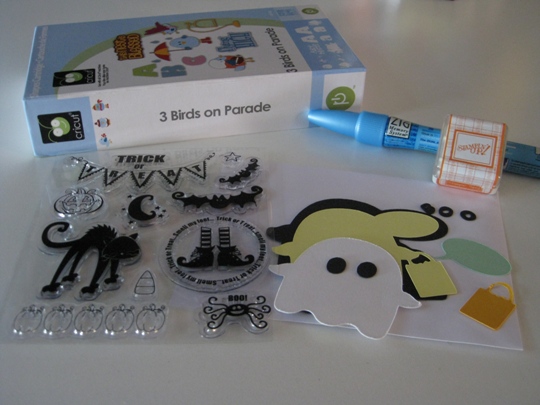
Using my Cricut Expression machine, I cut each layer out  at 3 inches which is perfect for this A2 size card, which is 4 1/4 x 5 1/2.  And for the inside of the card I rubber stamped the saying Trick or Treat using Stampin’ Up orange ink, and a clear Halloween stamp set that I have no clue who made this set, sorry, but I took a picture to show you the set.

cricuthalloweencardsupplies

I put this all together using the Zig two way glue pen.  I just love the way it turned out.  I will definitely be sending these cute handmade Halloween cards out to wish my family and friends a Happy Halloween.

cricutcardprojects

Make it a Great Day and don’t forget to leave time to Craft!

Two Cricut Cartridges Makes For One Perfect Pear Cricut Card Idea

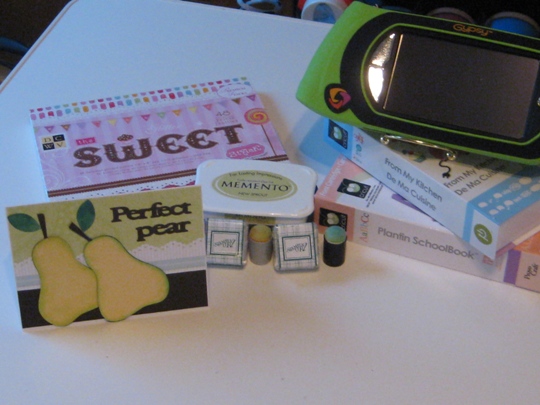
I just love these machines, that is my Cricut Expression and Gypsy.  If you have the smallest Cricut Card Idea, you can make it into the best card idea ever.

cricutcartridgesandsupplies usedperfectpearanniversarycard

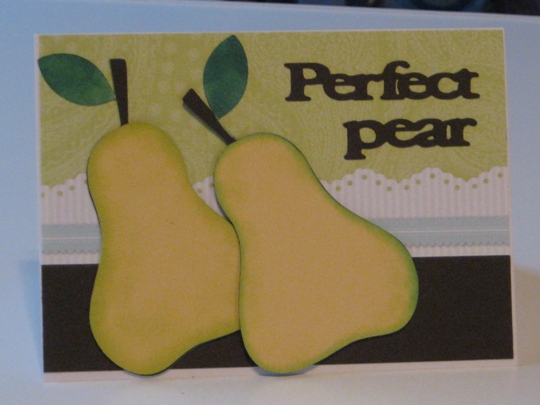
If you are in the “crafty world” you have seen this pear before.  But when you actually make it yourself it is sooo perfect, cute and also quick.

All I did was cut out two pears using the From My Kitchen Cricut Cartridge using the Cricut Expression machine. Then using my Gypsy and the Plantin Schoolbook Cricut cartridge I typed the words and also welded them together so that they would cut out in one piece instead of individual letters (makes it so much better when adhering to the card).

I then used some Memento Dye Ink color New Sprout and Stampin Up Dye Ink colors Glorious Green and Forest Foliage.  Using some  blenders to add some color to the edges of the pear for the soft real look.

For the background I choose paper from DCWV and also just a scrap piece of brown paper that I had left over from the shadow pieces that I used for the pear, for the bottom border of the card.

Look how great this card looks.  You will be able to send this to any perfect couple on your list for an Anniversary or just because they are a Perfect pear!

cricutcardideasanniversarycard

Make it a Great Day and don’t forget to leave time to Craft!

Another Great Cricut Card Idea using the Paisley Cricut Cartridge for a Really Fun Birthday Card

I just got a new cell phone, a cute little Jest from Verizon.  My previous phone was really old and it was just a phone, no keyboard or any of the cool things that a cell phone has now a days.  So this new phone has a keyboard for text messaging and a pretty large screen so that I can see what I’m typing and most importantly what is being sent to me.  Now that I am all up to date with my new phone,  my niece and nephews are “texting” me, and it’s really great to be in touch with them.

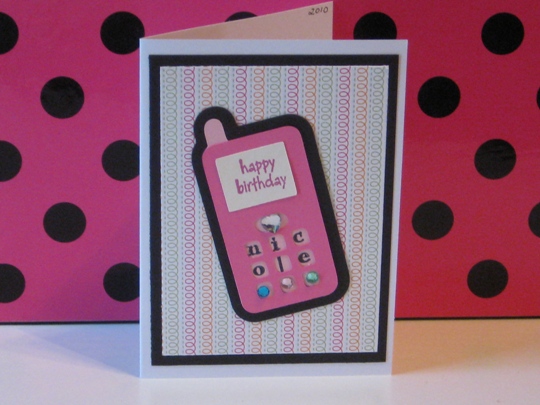
I thought that this Cricut card idea of a cell phone would be just perfect.  So using the Paisley Cricut cartridge, and my Cricut Expression machine, I cut everything at 3 1/2″.  Then for a personal touch to this great birthday card I decided to also use some rubber stamps.  I stamped happy birthday using a hero arts stamp on a plain white piece of cardstock that is the screen of the cell phone.  Instead of numbers on the keypad, I stamped the birthday girls name Nicole,  using studio G stamps.  Then filling in the empty spaces with some rhinestones added that special “bling” that every card needs.   I also used the Glitter Sweet stack paper from DCWV for layering the background.

I can think of so many Cricut Card Ideas, and hopefully you can too.  So get busy and start creating your own special Cricut Cards.

cricutcardideausingcricutpaisleycartridge

Wishing Nicole a Fantastic 10th Birthday!

Make it a Great Day and don’t forget to leave time to Craft!

Stand and Salute Cricut Cartridge Is Perfect For A 4th of July Scrapbook Page

With the 4th of July just around the corner, I wanted to use the Stand and Salute Cricut cartridge to make a scrapbook page.  I have been rubber stamping for the past couple of weeks and it sure feel fantastic to use my Cricut Expression machine again.

We will be going to a friends house for a BBQ on the 4th and you know that I will be taking pictures to capture the fun.

The best part of the 4th for me is watching the firework display in the evening.  It’s funny, I am petrified of fireworks when I am close to them but from a distance, they are beautiful.

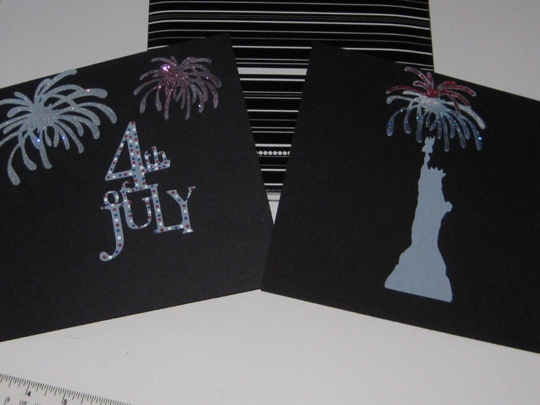
So using my Cricut Expression machine, I cut the fireworks image and made it in three different sizes and also cut the image of the Statue of Liberty.  Growing up in New Jersey the firework display was over the Hudson and watching it on television they always showed the Statue of Liberty in the distance with the fireworks above.  And seeing it in person was just unbelievable.  The roar of the crowds Ooooooooh’s &  Aaaaaaaah’s, bands playing music to go with the fireworks, great friends to share the evening with, what else could one ask for, it was fantastic!

I love those memories but let’s get back to the scrapbook page, so after cutting the fireworks, I added some glitter to each using Martha Stewart fine glitter, for that extra sparkle.  And for the wording I made polka dots using red and blue markers from ek success and for the white the Martha Stewart opaque marker.

When I print my pictures depending on how many, I will use either the small wallet photo size or maybe even the thumb print size to just put around the page.

standandsalutecricutcartridge4thofjulyscrapbook

I want to take this opportunity to thank all of the Military Men and Women all around the world who keep me and my family safe everyday.  I can’t thank you enough for all of your dedication and courage.  God Bless each and every one of you.

A Fun Summer Handmade Greeting Card For A Pool Side Birthday Party

I have been having so much fun with these House Mouse Rubber Stamps lately.  Have you ever just gone shopping in your own craft room, finding things that you didn’t know or forgot that you had?   Well I think these House Mouse Rubber Stamps have a theme for just about anything.

My girlfriend was having a pool side birthday party so I had to keep with that theme for her handmade birthday card.

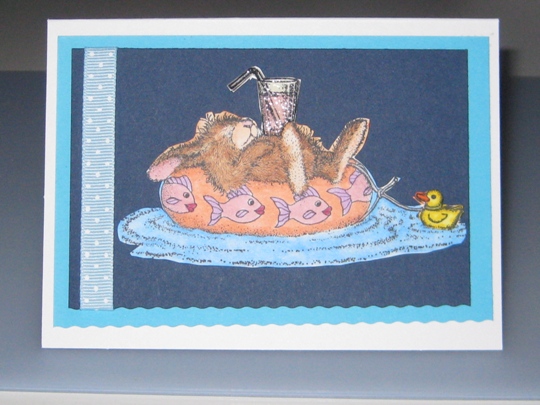
I used the House Mouse Bunny Cruise stamp.  I first stamped the image in white cardstock with Tuxedo Black Memento Dye Ink.  Then I colored the image with Copic Sketch markers.

Thinking that this card needed a little lift, I decided to cut out the image and used pop dots to make the 3-D look.  It still wasn’t what I wanted so I stamped the image again on the white card stock and just colored in the little duck and the cocktail and cut them out and made another layer using pop dots for those to images to stand out even more.  I used my clear embossing marker and some clear embossing powder on the cocktail to make it look like a shiny glass.  After layering with some different color blue cardstock, and cut the bottom with a wavy cut from my Purple Cows paper cutter, and finished the handmade birthday card off with some polka dot ribbon.

I hope you enjoy this card as much as I enjoyed making it.

housemousebunnycruisebirthdaycard

Make it a Great Day and don’t forget to leave time to Craft!

Page 37 of 53
1 35 36 37 38 39 53