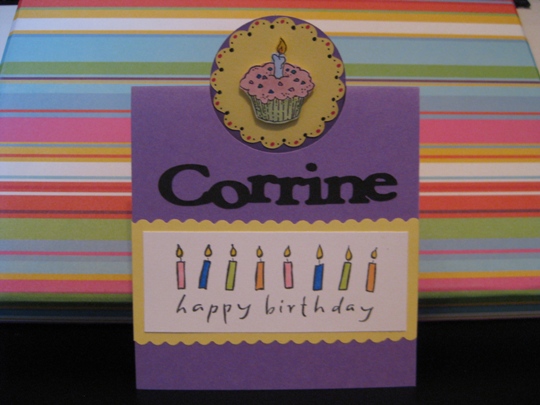
I went to the local rubber stamp show a few weeks ago and I could not believe how much rubber was in one place LOL ~ Anyway, I got so many great ideas for card making that I just have to share a birthday card that I made.
I used my Cricut Expression with the Mini Monograms Cartridge for the scalloped circle on the top. I then stamped the cupcake with a rubber stamp from Stampendous on white cardstock using Memento tuxedo black dye ink, colored with Copic Sketch markers and then cut it out and used pop dots to adhere onto the scalloped circle.
For the happy birthday I stamped this Hero Arts stamp on white cardstock, again Memento tuxedo black ink and coloring the images Copic Sketch markers. I went to put it onto the card and it looked “boring” so decided to layer it also. Instead of using my Cricut Expression to cut the scalloped edge, I used Fiskars Paper Edgers scissors and got the same look. (it was also alot quicker).
Oh, I forgot to tell you. The purple cardstock was cut using the Creative Memories Circle Cutter. Since I only needed a half of circle cut to make this look, I couldn’t use a paper punch or my Cricut Expression, so this worked out perfect. (Yeah Creative Memories!) Then I scored the cardstock using the Martha Stewart scoring board.
When I finished this card it looked great but I wanted it to be even more special, so I took out my Cricut Gypsy and used the Plantin Schoolbook cartridge with the roly poly feature and typed the birthday girls name, welded it together, cut it out with the Cricut Expression machine and “wala” a really special personalized card.
Make it a Great Day and don’t forget to leave time to Craft!


