Handmade Birthday Cards Are So Much Fun To Make When You Have A Cricut Expression Machine And A Great Cricut Card Idea

I always loved to make handmade cards, but it is so much fun with a Cricut Expression machine.  My nephew is turning 13 and I needed to make a “cool” card.  When Luke was out visiting us a few years ago, we were always laughing so I wanted his card to make him laugh.

So using the Animal Kingdom Cricut cartridge I cut out the cow and all of the layers.  Added some stickles to give him (the cow) a little “pizazz”.  Then using the Cricut Gypsy, I welded together the phrase for the front of the card using Plantin Schoolbook and before I added it to the front of the card with pop dots, I used a white opaque Martha Stewart marker and added some polka dots.  Oops I almost forgot the grass is also from Plantin Schoolbook grass border.

animalkingdomcricutcartridge

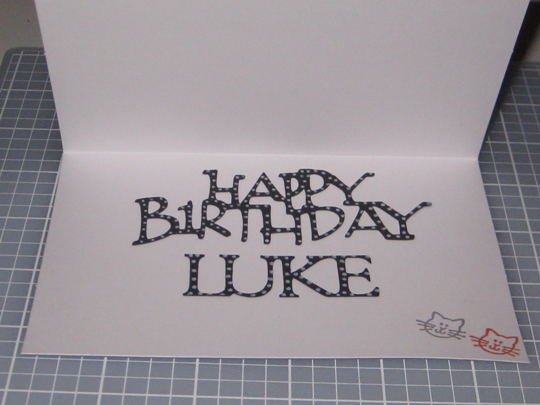
For the inside of the card I used the Beyond Birthdays Cricut cartridge for the phrase Happy Birthday and then I found a similar font for the birthday boys name.

beyondbirthdayscricutcartridge

Hope you enjoyed my birthday card, and my funny sense of humor.  Wishing Luke a Fantastic 13th Birthday!

Make it a Great Day and don’t forget to leave time to Craft!

A Great Cricut Card Idea for a Get Well Card Using Life’s A Beach Cartridge

Happy Tuesday Everyone ~ Hope you are all having a Wonderful Day

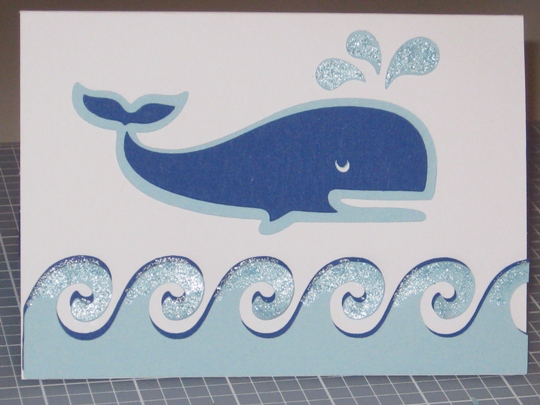
Today I needed to make a get well card for a dear friend who is going through a rough patch with his health.  I’m sure that he is receiving alot of cards with your typical message inside.  I on the other hand wanted to make him a handmade get well card to definitely put a smile on his face, so I decided to make a Get Whale Soon Card.

cricut card idea get whale soon

get well cricut card idea

I cut the whale with my Cricut Expression machine using the Life’s A Beach Cricut cartridge, along with the border of waves.

Then I used my Cricut Gypsy for the inside message using the Plantin Schoolbook cartridge for the font and the welding function to attach the letters together.

I had to give this card some “bling” so I used Baby Blue Stickles to add to the waves, and also made some polka dots on the letters with my Zig writer marker.

I hope that this card is what the doctor ordered to put a smile on his face.  Hope you like it too!

Make it a Great Day and don’t forget to leave time to Craft!

Many Fun Cricut Card Ideas Using the Animal Kingdom Cricut Cartridge

Today I am making a Cricut Card, a birthday card to be exact, for my Godson Tyler who is turning 11 years old this month.  I have so many great Cricut card ideas, but I want this birthday card to be really special and fun.

So, I got myself comfy on my sofa with my Gypsy for awhile and went through my cartridges and even some cartridges that I didn’t have, (you can view and also design with all the available cartridges with your Gypsy, you just can only cut with the cartridges that you own) to find something different, not just your ordinary birthday card look and I found it.  I have such a great Cricut Card Idea!

Using the Animal Kingdom Cricut Cartridge, I found a fish bowl with some really cute fish and plants to put inside.

animalkingdomcricutcartridgebirthdaycard

I cut the fish bowl using my Cricut Expression cutting machine at 3 inches, the fish at 1½ inches and the plant at 2 inches.  I attached all the pieces to a 4×5½ white card with my glue glider pro and for the “bubbles” I used pop dots for dimension.  I then added some stickles, funky fibers and a real star fish for the finishing touch.  I wanted the Happy Birthday Tyler to look like bubbles coming out of the fishes’ mouth.

There are so many shapes in each cartridge, you just have to put your “creative hat” on and get crafting.  You never know how it’s going to turn out, just wish for the best and remember “You Made it Yourself” , this is a handmade greeting card, which makes it even more special for the person who is receiving it!

~ Happy Birthday to my Fantastic Godson Tyler ~

Wish I could be there with you to celebrate and to give you a Big Hug & Kiss!

Make it a Great Day and don’t forget to leave time to Craft!

What Can You Make Using The Plantin Schoolbook Cricut Cartridge, A Cricut Expression Cutting Machine And The New Cricut Gypsy?

The answer is a really cool birthday card.

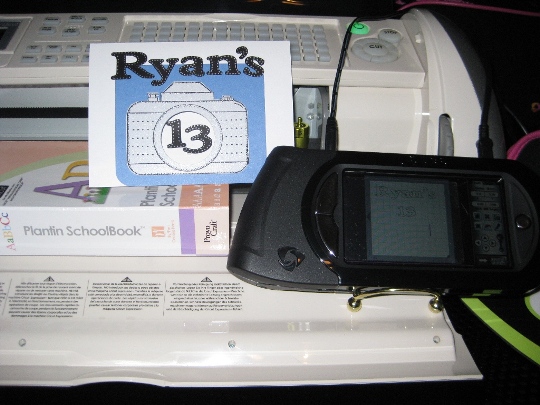
The Plantin Schoolbook Cricut cartridge is what I used to make a birthday card for my nephew Ryan who is turning 13.  I had to make something “cool” and not cute since he is now a teenager.  His parents (my sister) got him a digital camera and I wanted to keep that theme for his card.  So I looked at all my cricut cartridges and wouldn’t you know it, I didn’t have any of the cartridges that have an image of a camera.  Guess I need to make another wish list.

So I looked though all of my rubber stamps and if you have followed my blog, you know that I have stamps.  And I was in luck.  I have a stamp of a camera from a company called scrapbookin’ stamps that is no longer in business.

So I stamped the camera on silver paper (his camera is silver) and used black pigment ink and clear embossing powder to set the ink.

Then I used a circle paper punch and I was in luck, it was the correct size to punch the lens out of the camera.  I also punched a circle in the blue paper that I mounted the camera onto, and also the white card cover.  I rounded the corners of the blue paper so they matched the rounded edges of the camera.

usingplantinschoolbookcricutcartridgetomakehandmadegreetingcard

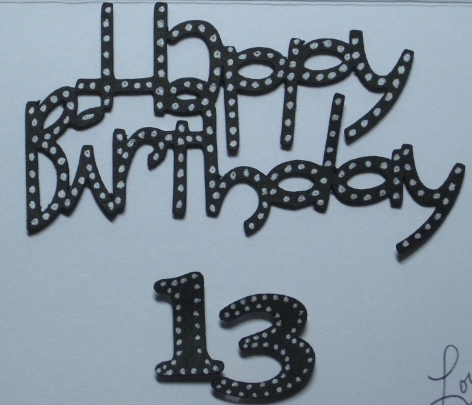
I then took out my Cricut Gypsy and looked though the cartridges and chose the Plantin Schoolbook cricut cartridge to cut out the letters and numbers for this card.  I really like the Roly Poly feature for this.  I used my Cricut Expression cutting machine to cut these out.  After I cut out Ryan’s name and the numbers 13, I wanted to add just a little “bling” to them so I used a silver gelly pen and outlined them with dots.  I think it turned out pretty cool.

messageinsidehandmadegreetingcardusing cricutcartridge

Did I forget to tell you how much I love my new Cricut Gypsy!

I used my permanent adhesive glue glider to put Ryan’s name down then I used dimensional adhesive dots for the 13 because I wanted it to pop out of the camera.  Remember, I cut the hole so that when he opens the card the 13 will be in the inside of the card also.

Wishing Ryan a Fantastic 13th Birthday ~ Wish we could be there to celebrate!

Make it a Great Day and don’t forget to leave time to Craft!

Page 3 of 4
1 2 3 4