Wrapping Presents Can Definately Get You In The Christmas Spirit!

12 Days of Christmas with Joans Craft World

On the tenth day of Christmas…

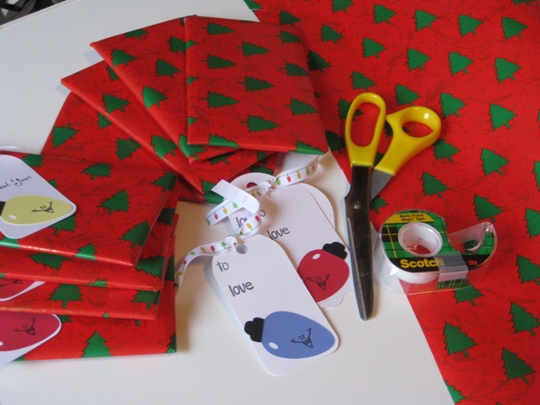
I hope that you all are having a great day.  Today I have to stop crafting with my Cricut Expression and my Rubber Stamps and start a different kind of Christmas Craft.  The craft of wrapping Christmas presents.  That’s right, I haven’t started wrapping presents and that means that I haven’t shipped our gifts to our family in New Jersey yet either.  Doing this at the last minute makes it more fun.  HoHoHo!

I have the ABC Family channel on watching  “A Dennis the Menace Christmas” while I am surrounded by Christmas wrapping paper and presents.  I thought Christmas tree paper would look really cute with the gift tags that I made the other day with the Christmas Cheer Cricut Cartridge and my Cricut Expression machine of different colored Christmas lights.

12daysofchristmaswithjoanscraftworld

The small gifts are all wrapped, now it’s time for the “real” presents to be wrapped.  Sorry can’t show you what’s inside just in case my family is reading this.  As soon as I am done wrapping, we will be off to the Post Office to use Priority Mail shipping and hoping that they get to our family in time for Christmas Day.

Make it a Great Day and don’t forget to leave time to Craft!

Cricut Christmas Crafts ~ Making A Family Snowflake Wreath

12 Days of Christmas with Joans Craft World

On the eight day of Christmas…

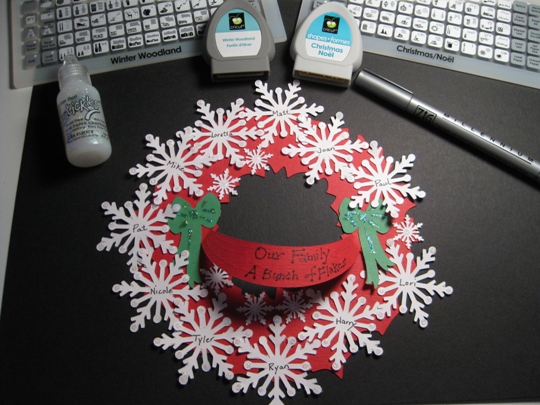
We are at the final stretch until Christmas and today I am making a Family Snowflake Wreath.  I will be using two Cricut cartridges and my Cricut Expression machine.

For the base of the wreath, garland and bows I used the Christmas Noel Cricut solutions cartridge .  I cut the wreath at 6″ using the shadow function key.  Then for the garland and bows I cut them out at 2 1/4″.

I then decorated the wreath with Snowflakes.  I used the Winter Woodland Cricut cartridge.  There are a few snowflakes on this cartridge but I really liked the one that is called Snowflk4.  I used the layers function key and cut this snowflake at 2 1/2″ on white cardstock.  I also cut some out at 1″ to fill in the blank spaces on the wreath.

Now for the really fun part.  I want this snowflake wreath to be my family wreath, so I wrote the names of each family member on a snowflake.  Then on the garland I decided to write Our Family ~ A Bunch of Flakes.  I wrote this with a Zig 05 Millennium black marker.

I glued each flake onto the wreath with a Zig 2 way glue and finished it all off with some Stickles at the end of each Snowflake for that special shimmer.

cricutcardprojectschristmascrafts

I Love the way this Christmas Snowflake Wreath turned out, and I don’t mind being a flake as long as my family is with me.

Make it a Great Day and don’t forget to leave time to Craft!

Quickutz Nativity 2×2 Dies vs Cricut Cutting Machine

12 Days of Christmas with Joans Craft World

On the fifth day of Christmas…

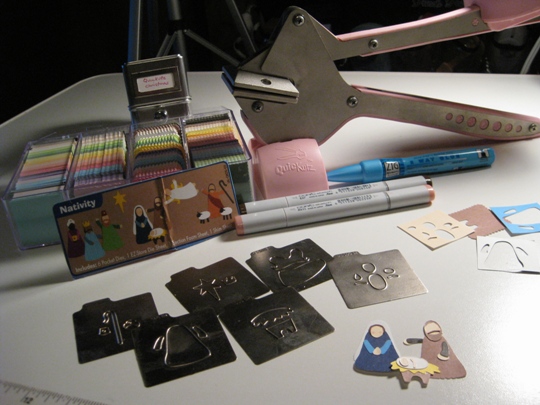
Many years ago, before I got my first original Cricut machine, I had (and still do have) a Quickutz Squeeze.  I started with the original blue one then of course upgraded to the pink (easier to use) one.  Anyway, I was going through all of the 2×2 metal dies that I have and came across the set of the Nativity.

So I decided for this Christmas craft that I would put this Nativity scene together.

I need to tell you all something I LOVE MY CRICUT EXPRESSION MACHINE!!!!!!!!!!!!!

I cut each image out by using the pink squeeze and my hand hurts already.  I know that I could use the Cuttlebug with the A, B and C plates to cut with these dies, but I want to make the entire Quickutz project with the Quickutz.  I have these small pieces of paper that fit perfectly over the metal dies so I’ going to use them and save paper.

The cutting part worked out OK, but holy cow, it’s really hard putting this all together since it is sooo small, and you have to figure out what piece to use over and over again for different parts of the scene.  If I didn’t save the piece of cardboard with the picture on it of what each image is suppose to look like, I would never have been able to put this together.  Well I gave up and only made Mary, Joseph and the baby Jesus.  I don’t even think that I put them together correctly.

quickutznativitypinksqueeze

That is why I love the Cricut Expression machine because you can make the shapes any size that you want.  Also the images are so much easier to put together.  Cricut takes the guess work out of how to put images together.

I’m not saying that the 2×2 Quickutz shapes are bad, I’m just saying the the Cricut cartridges are the best!

Make it a Great Day and don’t forget to leave time to Craft!

A Perfect Cricut Idea Using Your Cricut Expression and a Wooden Picture Frame

Have you ever wanted to make the perfect birthday gift for that special person?  Well I did and I think that I have succeeded.

When my Sister-in-law came to visit this summer, we had such a fantastic time.   We laughed, cried, drank and ate.  That’s right we ate.  We love food and her saying was “Food is Love”.  So the perfect gift to make was that saying in a wooden picture frame.

One afternoon I sat down with my Gypsy and found the perfect font to use and designed this gift.  I used the Jasmine Cricut cartridge and the Italic function key for the letters and then I used the Love Struck Seasonal 2010 cartridge for the hearts.  Everything was cut by connecting my Gypsy to my Cricut Expression machine.

I cut my background paper (it is from a value pack that I got at Hobby Lobby) and glued everything to it with my Zig 2 way glue pen, put the backing on the frame and it’s done.  Well it needed something else,  so I finished it off with some raffia that I wrapped around the frame and made a bow.  Then I used my small heart punch by Fiskars and punched lavender hearts and added them with Scrapbooker’s Glue by Scotch to the ends of the raffia for that special touch.

jasminecricutcartridgelovestruck2010cricutcartridge

I hope that Fran likes her gift because it was so much fun making this present.  It brought back all of the fun memories of our visit together this summer.

Make it a Great Day and don’t forget to leave time to Craft!

A Halloween Cricut Card Idea Using The Designer’s Calendar Cartridge

Here is the quickest and cutest handmade Halloween greeting card. I used the Cricut Designer’s Calendar cartridge to cut out this hanging spider that was cut at 3 1/2 inches with my Cricut Expression machine and then attached it to a web that I cut with a Martha Stewart border punch.

This is a perfect “spooky” Cricut Card Idea that you can make using some of your paper scraps.  We all have that pile of scraps, whether they are in a basket, box, or organized by color in a large envelope.

I stamped the inside of the A2 card with the clear stamp set that I still can’t remember who it is from (you can see picture in the post from the other day), but this time I used tuxedo black memento ink.

cricutcardideaspiderdesignerscalendar

Now that I am looking at this picture, (and the card next to me) you may want to “bling” up your spider or the web with some stickles for a shimmery, sparkly effect.  I just might do that!

Make it a Great Day and don’t forget to leave time to Craft!

Page 3 of 7
1 2 3 4 5 7