Happy Fall Ya’ll

Hello My Fellow Crafters.

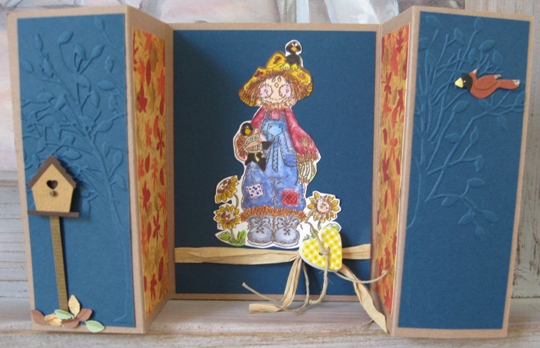
Fall is my favorite time of year.  Pumpkins, scarecrows, beautiful colors of the leaves changing and the list can go on and on.  Today I want to share with you a fall handstamped/handmade greeting card that came out pretty darn cute 🙂

handmadegreetingcardscarecrow

This Scarecrow was stamped on white cardstock with tuxedo black memento ink, colored with Copic sketch markers, then cut out using cutter-bee scissors.  I wanted some texture and dimension to this card so I decided to use  the Cuttlebug.   I took the two blue panels and put them into an embossing folder of a tree, so when the card is closed you can see the entire tree.

As cool as that looked it still needed “something” so using a paper punch of small leaf I punched out some leaves and used small dots for some dimension.  Then I found some 3D stickers in my stash of this birdhouse and bird, so thought that would be the perfect addition.  Still this card needed some more color so I cut two panels of colorful fall leaf cardstock.  Once I added those panels the colors of the scarecrow came to life.  Finished it off with some raffia and a wooden heart shaped button.

~ Happy Fall Ya’ll ~

Make It A Great Day and Don’t Forget To Leave Time To Craft!

Coffee Cup Cricut Card Idea

Hello My Friends,

Today I want to share with you a handmade coffee cup birthday card that I made for my brother-in-law.  I have seen lots of cards in the shape of a coffee cups like the ones you would see at your local coffee shop, and I thought that would be a fun idea for a birthday card.  Well after looking at all of my Cricut Cartridges, would you believe that I did not have that cartridge?    So here is where a little imagination and some creativity comes in.

Using the From My Kitchen Cricut Cartridge, Gypsy and Cricut Expression machine,  I made a coffee cup card.

I cut the shape in blackout mode of the refrigerator, yup, you read that correctly the refrigerator.  All I did was cut the two small legs off the bottom and I had the shape of a coffee cup.  I was enclosing a gift card into this card so i just made sure when sizing this card that the card would fit inside without sticking out.  Using the Gypsy I welding the sides together which made a card.  All I needed to do is fold in the center.

coffeecupcricutcardidea

As I am writing this post and looking at the From My Kitchen Cricut Cartridge booklet and  I am laughing because I could have just used the shift function and I would have got the same image and wouldn’t have had to cut off the legs. 🙂

Anyway I increased the size and cut it out again but his time with a brown cardstock.  Then using a paper cutter (or you could use a scissor) just snipped off the top pf the refrigerator shape to make it look like a lid.  It looked good but seeing pictures of coffee cup lids they had some curve to it, so I took a small oval paper punch and with one punch on each side did the trick of looking like a lid.  Then added a piece of raffia for a little extra dimension.

For the bottom half of the coffee cup took the brown cardstock, cut a strip that would wrap around the entire card (just like the cup wrap you would get in a coffee shop so you don’t burn your hands on the hot cup)  ran that strip through the Cuttlebug with embossing folder.  Final touch was the circle birthday sentiment, circle punch then applied with a pop dot.

~ Happy Birthday Harry ~

Make It A Great Day and Don’t Forget To Leave Time To Craft!

Oreo Cookie Cricut Card Idea

Hello My Friends,

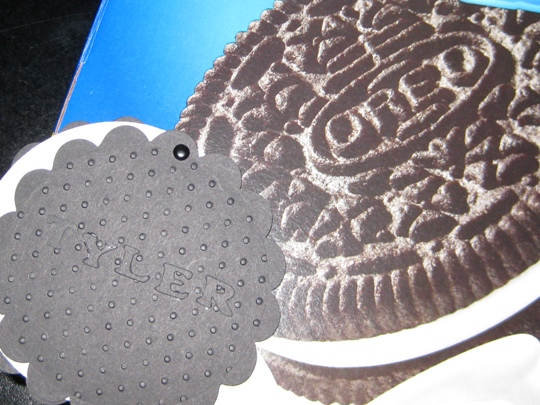
My Godson’s birthday is this month and I wanted to make him a special card.  He loves cookies and we sent him a big box of Oreo cookies as part of his present.  As I was looking the box it gave me a great idea.  Make a Oreo cookie card.

The Picture didn’t come out that good but the card looked great!

cricutcardideacookie

I made the cookie using the Cricut Expression along with the Mini Monograms Cricut Cartridge.  The circle scallop shape was great  for the cookie top and bottom and just a circle for the cream.  Also using the Cuttlebug I embossed the top with the polka dot embossing folder.

Then to make it a personal cookie instead of cutting out the letters for Oreo I used the Plantin SchoolBook Cricut Cartridge and cut out Tyler’s name for the top of the cookie.  Attached the top and bottom with a mini brad.

Looking at this picture as I am writing this post is making me want a big glass of milk and some cookies 🙂

Wishing Tyler A Very Happy Birthday!

Make It A Great Day and Don’t Forget to Leave Time To Craft!

Card Supplies:


Handstamped Birthday Card Idea along with Cricut Card Idea

Hello My Friends,

Have you ever made a card and when it was complete said to yourself or out loud “Wow that looks Fantastic”?  Well, I just did 🙂

Having a Handstamped Birthday Card Idea along with Cricut Card Idea can only turn out to be Wonderful!

Using just two stamps from Stampin’ Up, a few paper punches from Stampin’ Up and Marvy Uchida , Cuttlebug with polka dot embossing folder, Cricut Expression machine, Lovely Floral Cricut cartridge, cardstock from The Paper Cut, and some pearl embellishments from Jolee.

handstampedcricutcardidea

When I was done with the stamping and layering of this card it looked great but it needed just one more thing.  I had to add an image from the Lovely Floral Cricut lite cartridge.  The butterfly was perfect.  It added the final touch to this handmade birthday card.  And you know me, I love my Cricut 🙂

Make It A Great Day and Don’t Forget to Leave Time To Craft!

Card Supplies:

A Colorful Handmade Birthday Card

Hello My Friends,

I have been looking thru all of my pictures of greeting cards that I have made and  I came across this colorful handmade birthday card that I never shared with you.  It was so super easy to make that I had to make this quick post to show you.

colorfulhandmadebirthdaycard

As I was getting all the information about how to make this card, I went through my rubber stamps and I noticed that I have quite a few clear stamp sets and acrylic blocks.  You can have soooo many more clear stamps and not need alot of space to store them 🙂 and the clean up is even so much better then using the wood mounted stamps (well that’s my opinion) and just to let you know I have a “ton” of wood mounted stamp.

I  made the layers of the card using Spellbinder Nestabilities, and running them through the Cuttlebug machine.  The stamp used is from Stampin’ Up! and the markers used for coloring the letters are from Tombow, Stampin’ Up and also EK Success.

Make It A Great Day & Don’t Forget to Leave Time To Craft!

Card Supplies:

Page 2 of 5
1 2 3 4 5