Handstamped Birthday Card Idea along with Cricut Card Idea

Hello My Friends,

Have you ever made a card and when it was complete said to yourself or out loud “Wow that looks Fantastic”?  Well, I just did 🙂

Having a Handstamped Birthday Card Idea along with Cricut Card Idea can only turn out to be Wonderful!

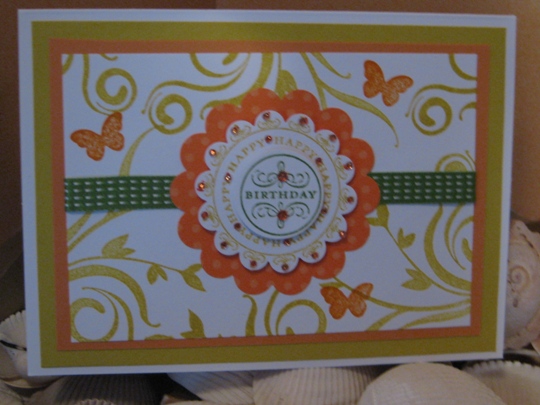
Using just two stamps from Stampin’ Up, a few paper punches from Stampin’ Up and Marvy Uchida , Cuttlebug with polka dot embossing folder, Cricut Expression machine, Lovely Floral Cricut cartridge, cardstock from The Paper Cut, and some pearl embellishments from Jolee.

handstampedcricutcardidea

When I was done with the stamping and layering of this card it looked great but it needed just one more thing.  I had to add an image from the Lovely Floral Cricut lite cartridge.  The butterfly was perfect.  It added the final touch to this handmade birthday card.  And you know me, I love my Cricut 🙂

Make It A Great Day and Don’t Forget to Leave Time To Craft!

Card Supplies:

A Colorful Handmade Birthday Card

Hello My Friends,

I have been looking thru all of my pictures of greeting cards that I have made and  I came across this colorful handmade birthday card that I never shared with you.  It was so super easy to make that I had to make this quick post to show you.

colorfulhandmadebirthdaycard

As I was getting all the information about how to make this card, I went through my rubber stamps and I noticed that I have quite a few clear stamp sets and acrylic blocks.  You can have soooo many more clear stamps and not need alot of space to store them 🙂 and the clean up is even so much better then using the wood mounted stamps (well that’s my opinion) and just to let you know I have a “ton” of wood mounted stamp.

I  made the layers of the card using Spellbinder Nestabilities, and running them through the Cuttlebug machine.  The stamp used is from Stampin’ Up! and the markers used for coloring the letters are from Tombow, Stampin’ Up and also EK Success.

Make It A Great Day & Don’t Forget to Leave Time To Craft!

Card Supplies:

A Special Handstamped Birthday Card

Hello My Stamping Friends,

I can’t believe it’s January when the temperature outside feels like summer 🙂  I’m really loving this Florida weather.

Today I made a handstamped birthday card for my sister using some fun rubber stamping ideas.  Now that I see the finished card,  I also used some bright summertime colors as well.

handstampedbirthdaycard

I can’t remember the last time that I made a card that I didn’t use a layering technique.  It just brings the handstamped card to life when you add some pop dots and other paper embellishments.

The rubber stamps  that I used are from Stampin’ Up! as well as the scalloped punch, the circle punches that I used are from Marvy Uchida but remember, you can use any stamps and paper punches that you have in your own supplies to make your special handmade, handstamped birthday card for your special person.

Happy Birthday Lori

Make It A Great Day & Don’t Forget to Leave Time To Craft!

Handstamped Greeting Card Using Triple Time Stamping Technique

Hello My Friends,

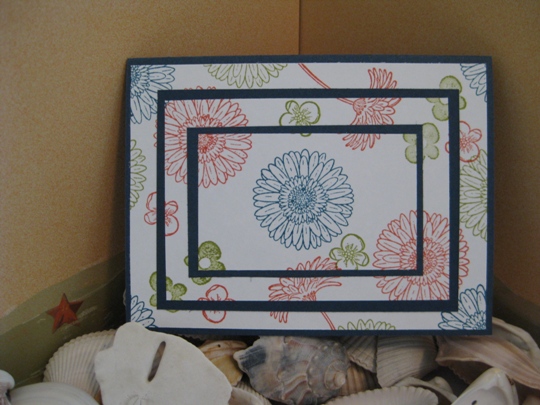
I have a new handstamped greeting card idea with a new technique that I just learned and it looks great so I just had to share with you.  It’s called the triple time stamping.  I’m sure you can stamp as many layers as you like but this one is done in triple layers.

You can use any colors that you want I just loved the combination of these colors.

The first thing you need to do is cut some card stock.

White – three pieces cut into 2″  x 3″  1/4″, 3″  x 4 1/4″ and 4″  x 5 1/4″

Navy – three pieces cut into 2 1/4″ x 3 1/2″, 3 1/4″ x 4 1/2″ and 8 1/2″ x 5 1/2″

Now the fun part begins.  Take the three pieces of the  white cardstock and put just one little spot of adhesive on the back of each one (just enough to hold it down but not really stick, cause you will be removing it) and then layer each piece on top of one another

tripletimestampingtechniquestep1

Now all you need to do is stamp the image as if it was a single sheet of cardstock.  You will see the white lines around the stamped image but don’t worry you will never know once we are done.

When you are all done stamping, gently take apart each layer and put them onto the Navy cardstock.

Since the inside of the card is Navy card you may want to cut a piece of white cardstock and stamp a little something inside to bring the card all together.

To finish the card you just have to layer the pieces on top of each other, matching the design.  It feels like I am making a  stamping puzzle.

tripletimestampingtechniquejoanscraftworld

Well, what do you think?  Doesn’t it look great?  And it really wasn’t hard to make either.  Hope you enjoyed this new triple time stamping technique.

Make It A Great Day & Don’t Forget to Leave Time To Craft!