Another Great Cricut Idea ~ A Cricut Tree

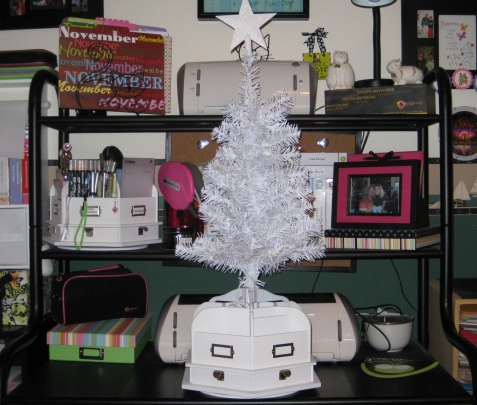
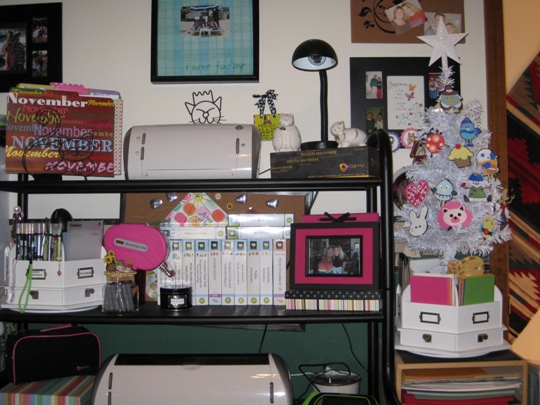
My two favorite things are decorated Christmas trees and anything Cricut.  So I had an idea.  Why not make a Cricut Tree that I can have displayed all year round.  That’s right an all year tree decorated with images that I have made using my Cricut Expression machine from various Cricut cartridges.

joanscraftworldcricuttree

I found a perfect white tree (that even has little white lights) at Walmart for under $10 and that included the star that I bought for the top.  When I got it home I wanted to give it a permanent place in my studio aka Joans Craft World.  So what I did was took my white Making Memories carousel that I keep my extra Cricut blades and other supplies in and cleaned it all out.  Then with crazy glue I glued the three legs of the tree stand onto the carousel so it will not fall down.

joanscraftworldcricuttree

I then put all of the supplies back in there place and since I’m not going to have the lights on, the cord fits great in the compartments that are in this carousel.  I placed my Cricut tree on top pf my 12×12 paper holder that is next to my Cricut workstation.  I decorated my tree with some Cricut images and voila the perfect Cricut Tree.  What is really cool is that since it is on the carousel, I will be able to turn it to see all of my Cricut images. I just love this cricut idea and hope that you like it too.

Make it a Great Day and don’t forget to leave time to Craft!

A Cricut Card Idea For A Handmade Thanksgiving Card

Making handmade Thanksgiving cards for our family is really making me feel so grateful for having such wonderful people in my life.  It is really hard living so far away from our family, and during the holidays we miss them even more.  So when I was making these cards, I was reminiscing of all the fun Thanksgivings that I have had in the past with our family, and how much food was always on the table.  Now that’s something to be Grateful for.

I used the 3 Birds on Parade Cricut Cartridge to make these cards.  I think this cartridge is so cute for every holiday. I cut the Pilgrim image at 3  1/2 inches using my Cricut Expression machine.  Then glued it all together with a Zig 3 way glue pen.  I then layered the pilgrim onto  a embossed pieced of leaf paper by K&Company for a fall look.  Using the phrase feature key I cut the word Grateful at 1 inch and attached it to the bottom of the card. This card puts a smile on my face it’s so cute.  I hope it does the same for our family.

3birdsonparadecricutcartridge

I am very Grateful to everyone who stops by to read whats new in Joans Craft World.

~Wishing you and your families a Very Happy Thanksgiving~

Cricut Card Idea That Turned Into A Housewarming Gift

Our friends just moved into their new home and invited us over for dinner.  I wanted to make a handmade housewarming gift using my Cricut Expression Machine.

Since my Gypsy has been sick and is going into the Provo Craft hospital next week, I have been using my Cricut Design Studio.  It works great but you have to sit at your computer to design which when you have a Gypsy you get spoiled designing any place that you like.   Anyway, I started to design a cricut card and it turned into a framed plaque.

plantinschoolbookandjasminecricutcartridge

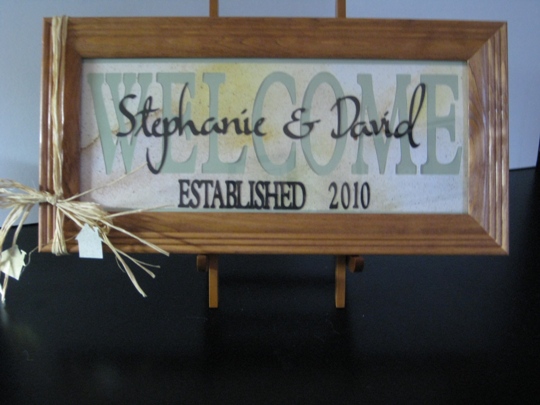
I used a neutral paper, since I was not sure what colors they were using in the house.  Then I cut the word Welcome using the Plantin Schoolbook Cricut Cartridge.  I altered the welcome with my Design Studio to get the perfect size that I needed to fit inside of the frame.  Then  I cut it out with my Cricut Expression Machine I really liked the way it looked using the “negative” piece of paper. (instead of using each individual letter separately.  Using the same cartridge Plantin Schoolbook I cut out the word Established and 2010 and again altered it with the Design Studio for a perfect fit.

For there names I wanted to use a Cricut Cartridge that had a script font.  So looking thought my library of Cricut Cartridges I decided to use the Jasmin Cricut Cartridge.

I glued it all together with the Zig 2 Way glue pen for the words cut in the black cardstock and for the large Welcome piece, I used my new pink ATG gun to put onto the light aqua green cardstock.  Put it all in a frame. I completed this project by using some raffia that I tied around the frame and then used a paper punch from Family Treasurers of a house that I added to some of the ends of the raffia.

I love the way this turned out and I hope they enjoy there handmade house warming gift, and many years of happiness together.

Make it a Great Day and don’t forget to leave time to Craft!

A Perfect Cricut Idea Using Your Cricut Expression and a Wooden Picture Frame

Have you ever wanted to make the perfect birthday gift for that special person?  Well I did and I think that I have succeeded.

When my Sister-in-law came to visit this summer, we had such a fantastic time.   We laughed, cried, drank and ate.  That’s right we ate.  We love food and her saying was “Food is Love”.  So the perfect gift to make was that saying in a wooden picture frame.

One afternoon I sat down with my Gypsy and found the perfect font to use and designed this gift.  I used the Jasmine Cricut cartridge and the Italic function key for the letters and then I used the Love Struck Seasonal 2010 cartridge for the hearts.  Everything was cut by connecting my Gypsy to my Cricut Expression machine.

I cut my background paper (it is from a value pack that I got at Hobby Lobby) and glued everything to it with my Zig 2 way glue pen, put the backing on the frame and it’s done.  Well it needed something else,  so I finished it off with some raffia that I wrapped around the frame and made a bow.  Then I used my small heart punch by Fiskars and punched lavender hearts and added them with Scrapbooker’s Glue by Scotch to the ends of the raffia for that special touch.

jasminecricutcartridgelovestruck2010cricutcartridge

I hope that Fran likes her gift because it was so much fun making this present.  It brought back all of the fun memories of our visit together this summer.

Make it a Great Day and don’t forget to leave time to Craft!

A Halloween Cricut Card Idea Using The Designer’s Calendar Cartridge

Here is the quickest and cutest handmade Halloween greeting card. I used the Cricut Designer’s Calendar cartridge to cut out this hanging spider that was cut at 3 1/2 inches with my Cricut Expression machine and then attached it to a web that I cut with a Martha Stewart border punch.

This is a perfect “spooky” Cricut Card Idea that you can make using some of your paper scraps.  We all have that pile of scraps, whether they are in a basket, box, or organized by color in a large envelope.

I stamped the inside of the A2 card with the clear stamp set that I still can’t remember who it is from (you can see picture in the post from the other day), but this time I used tuxedo black memento ink.

cricutcardideaspiderdesignerscalendar

Now that I am looking at this picture, (and the card next to me) you may want to “bling” up your spider or the web with some stickles for a shimmery, sparkly effect.  I just might do that!

Make it a Great Day and don’t forget to leave time to Craft!

Page 13 of 21
1 11 12 13 14 15 21