Hello My Fellow Crafters,
Well today is October 1st and I want to get an early start on Christmas ~ I should have started in August 🙂
So, as I was going though my Christmas Cardstock I found some that I knew I used a few years ago for our Christmas Cards so I couldn’t use it again this year so what to do with all this paper? Maybe cut it into strips and make a wreath? I remember seeing a wreath and I thought looked great and of course now I can’t find it, so I am going to “wing it” from memory and see what I come up with.
Well after a few cuts of paper all different sizes I though the best was to cut the strips in 1/2″ or 1/4″ and 12″ long, only because it was easier to curl the paper at this width. The bigger size didn’t curl and I was so afraid of getting a wicked paper cut. I curled the paper just as you would with gift wrap ribbon and a scissor, but used a bone folder and paper/cardstock.
So after cutting and curling I have this big pile of curled paper in front of me.
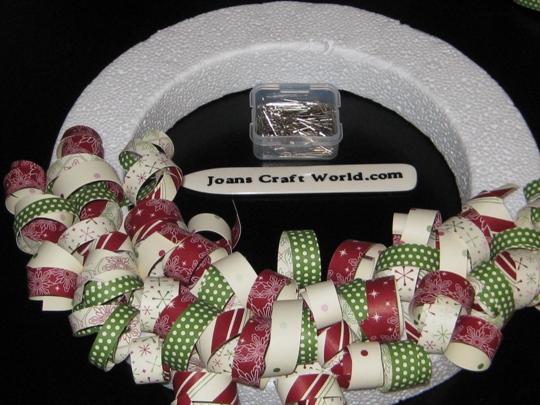
The next step is to get some sewing satin push pins and a Styrofoam wreath and start pushing the pins into the center of the strips of paper and then pushing the pin into the Styrofoam.
Then keep doing it over and over again and it will start looking like this. It will take awhile to do this so, put on your favorite radio station and start singing along OR this would be a great project if you don’t really like football but want to spend time in the same room with your family who do watch football all weekend 🙂
I forgot to take a picture of this part, but while the white Styrofoam is still not totally covered up with the paper curls, I wrapped a piece of twine around the wreath so when it was done I could hang it up without messing up the paper.
I just love the way it turned out! And the best part is that I used cardstock that would have been sitting in my drawer collecting dust but instead, I used it in a way that I don’t think I ever would have.
Now that it’s done, I betcha I can make wreaths for every occasion with the right colors of cardstock, and maybe add some paper embellishments onto the paper curls with a glue dot. Like I always say, the possibilities are endless when you create your own crafting projects.
Make It A Great Day and Don’t Forget To Leave Time To Craft!
Supplies:


