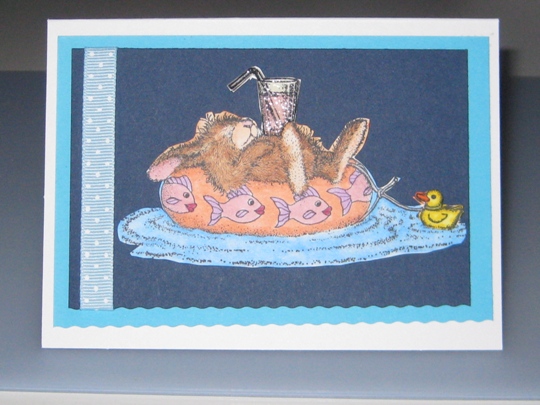
A Fun Summer Handmade Greeting Card For A Pool Side Birthday Party

I have been having so much fun with these House Mouse Rubber Stamps lately.  Have you ever just gone shopping in your own craft room, finding things that you didn’t know or forgot that you had?   Well I think these House Mouse Rubber Stamps have a theme for just about anything.

My girlfriend was having a pool side birthday party so I had to keep with that theme for her handmade birthday card.

I used the House Mouse Bunny Cruise stamp.  I first stamped the image in white cardstock with Tuxedo Black Memento Dye Ink.  Then I colored the image with Copic Sketch markers.

Thinking that this card needed a little lift, I decided to cut out the image and used pop dots to make the 3-D look.  It still wasn’t what I wanted so I stamped the image again on the white card stock and just colored in the little duck and the cocktail and cut them out and made another layer using pop dots for those to images to stand out even more.  I used my clear embossing marker and some clear embossing powder on the cocktail to make it look like a shiny glass.  After layering with some different color blue cardstock, and cut the bottom with a wavy cut from my Purple Cows paper cutter, and finished the handmade birthday card off with some polka dot ribbon.

I hope you enjoy this card as much as I enjoyed making it.

housemousebunnycruisebirthdaycard

Make it a Great Day and don’t forget to leave time to Craft!

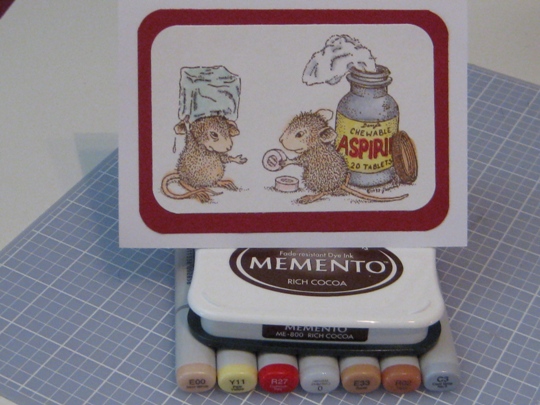
Making a Handmade Get Well Card Using Copic Sketch Markers and House Mouse Rubber Stamp

Hope everyone is having a great week so far.  Today I needed to make a get well card and wanted a change of pace from using my Cricut Expression to using rubber stamps.  I knew that I had the cutest House Mouse stamp that would be perfect to use with Copic Sketch markers.

So I stamped the image of white card stock using Memento Rich Cocoa ink.  Colored in the image with some Copic Sketch markers.

I then cut the stamped image to 4 1/2 ” x  2 3/4″ and with my EK Success corner punch I rounded the edges.  I placed that layer onto a burgundy piece of cardstock and again rounded the edges with the corner punch.  I adhered them all together using the Ad-tech permanent bond tape runner.

I almost forget, for the ice cube.  I used a clear/blue tinted embossing marker then added clear embossing powder and using my heat gun melted the powder to give the ice cube a shiny look.

This was a fun and also quick handmade card to make and hoping that it will make our friend feel a little better knowing that we are thinking of him.

HouseMouseGetWellHandmadeGreetingCard

Make it a Great Day and don’t forget to leave time to Craft!

Ways To Store Your Rubber Stamping Supplies With Your Rubber Stampede, Magenta Stamps or Other

All you need to make your own personalized greeting card or scrapbook page is a rubber stamp and a few rubber stamping supplies.  Sure you can personalize with your computer but is that really personal?  Not for me.  I love to make everything hand-made.  It is the personal touch that I really like.

Some basic rubber stamping supplies that you will need are of course a rubber stamp, ink pad and some paper.  But with all the really cool rubber stamping supplies on the market today, who can just use those three things?  Not me.

Your possibilities are endless when it comes to rubber stamping supplies.  They can be anything from an embellishment that you add to your card or scrapbook page, to the place where your embellishments are stored and organized.

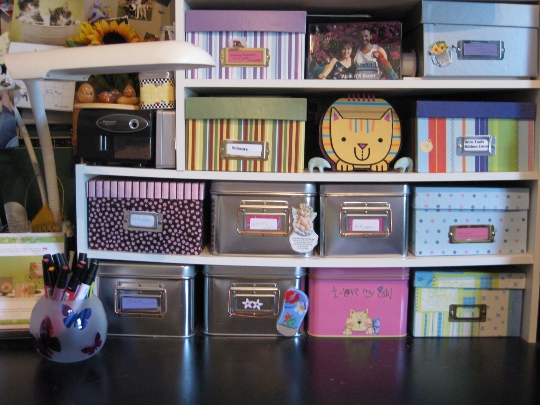
I keep all of my rubber stamping supplies in labeled containers.  Since I am not that good in remembering which manufacturer of stamps make my favorite stamps like the Magenta stamp, Rubber Stampede, Hero Arts, Outline Rubber Stamp, Stampendous and the list can go on an on,  (because they are all my favorites), I organize them by theme or by holiday.

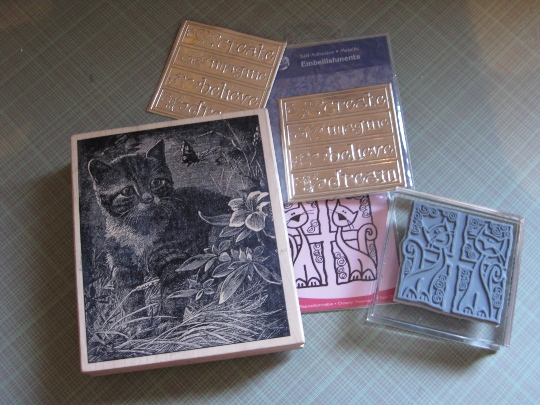
When I just listed some of the stamp manufacturers, I just remembered that I bought the cutest self cling Magenta stamp of two cats when I was at the stamp convention.  It reminded me of my two cats when they sit in our window looking like book ends.  Another Magenta stamp that I have is a wood block stamp with the image of a kitten in a field of flowers.  Wow, I almost forgot about that stamp.  I want to make some note cards with that one.

Besides Magenta stamp, Magenta also makes really cute Metallic, self adhesive embellishments that are really great for scrapbook pages, cards and even picture frames.  My favorite is a package that they have with four of my favorite words.  Create, Imagine, Believe and Dream.  I also have a really good video from Magenta “The Art of Stamping Magenta Style” that shows you how to use your Magenta stamp to its fullest.
magentarubberstamps

Another great summer time stamp is from Rubber Stampede.  It is a fun border stamp of cocktails.  You can use this stamp for a border or you can make an invitation for a cocktail party.  Rubber Stampede has fun stamps.  I also was on a “kick” of all oriental themed stamps, and Rubber Stampede really had some great looking stamps that I used a lot.  I can go on and on about how great Magenta and Rubber Stampede stamps are and for that matter each manufacturer of rubber stamps.  Maybe I will one day but not today.

rubberstampedestamps

I also keep some of my rubber stamping supplies in a spice rack.  That’s right a spice rack, I think of it as spicing up my crafts.  This is a great place for brads, eyelets, buttons, rhinestones and anything else that will fit in these small jars.

Rubber stamping supplies can also be housed in recycled containers.  Since I use a lot of embossing powder one great container that I use is a plastic grated cheese container.  It has the holes on one side to shake out slowly and the other side is one big opening that I use to put back the un-used powder back into the container with my funnel dish.

If you have some decorative metal tins, that is also a great place for rubber stamping supplies.  I have this really cure tin that stores my mini spot ink pads.

I remember shopping in a kitchen gadget store.  They had silver tins for recipes and I guess cooking supplies.  Well of course I bought them and now they are the new home for all of my brads that I have accumulated over the years along with some of metal picture corners that I have from Making Memories to pewter charms and Metallic embellishments from Magenta Stamps.
storageideasformagentaandrubberstampedestamps

Another great place for your rubber stamping supplies is photo boxes.  They are inexpensive and a great size to hold small paper packs, envelopes, packages of dimensional adhesives and even for cards that you have made for safe keeping.

For some of those big bulky foam stamps that you might have, a great place to store those and other odd shaped rubber stamping supplies are in a plastic clear shoe box.

The most important thing that I can say is LABEL all your rubber stamping supplies.  There is nothing worse than being in the middle of a project and wanting something to add to your piece of art and not knowing where to find it.

Make it a Great Day and don’t forget to leave time to Craft!

What Stamp Ink & Stamp Pads Should Be Used For Your Rubber Stamping Needs?

I received some questions regarding what kind of stamp ink and stamp pad that I use.  And it all really depends on what I am making.

Here is a picture of just some of the stamp pads and stamp ink refills that I own and use in my rubber stamping projects.

stamppadsandink50

My Stampin’ Up spots are all the dye ink classic stamp pads and the larger ones are the pigment craft stamp pads.  I also have a few Versa Color dot ink pads also, which are pigment ink.  If I showed them all to you there would be a huge pile so I just wanted to show you that I have them both.

There are several differences. Dye stamp ink absorbs into the paper where as pigment stamp ink sits on top of the paper and does not absorb. Pigment stamp ink tends to be thicker than dye stamp ink and is often preferred for scrapbooking because pigment stamp inks are more resistant to fading than most dye stamp inks.

Just remember that I am not a stamp ink expert, these are just the facts about ink.
Dye Ink (Classic Stamp Ink)
•    Dries quickly – you should be able to stamp your image and run your hand over it within moments and not have smearing
•    Wonderful for making handmade greeting cards
•    Not as expensive as the Craft Pigment Ink
•    No matter what color you use, you will not see more than a watermark if you stamp a light color ink onto dark paper.
Pigment Ink (Craft Stamp Ink)
•    Does NOT dry quickly – will smear if not heat set or let dry for a few minutes.
•    Recommend above classic ink for scrapbooking because it won’t fade.
•    This is the perfect ink if you are embossing, since it does stay wet longer your embossing powders sticks to it perfectly for you to heat set with your heat gun.
•    You can use a light color ink to stamp on dark paper and see the image well.  This adds a whole new world of things you can do!
The one I tend to use the most when doing my rubber stamping is probably the Craft Pigment ink.  I am a custom greeting card maker and love to emboss, so this is the perfect stamp ink for me.
I can also say that I have a few favorite manufacturers of stamp ink and stamp pads.  I love Stampin’ Up because they have various stamp inks & stamp pads in both dye and pigment inks and that match there papers.  My other favorite is Color Box, I think mainly because they are sold in my local crafting stores and are easily obtainable when needed.
Now this is just me but I also like the Craft Pigment Stamp Pads because they are made of a soft foam and when rubber stamping, I feel that I get better ink distribution than when I use the Dye Stamp pads that are made of a hard surface, that doesn’t budge.
If you have further questions just leave a comment!

Make it a Great Day and Don’t Forget to Leave Time to Craft!

A Cricut Project Using the Hello Kitty Greetings Cricut Cartridge

I needed to make a birthday card for my niece Nicole.  She really loves cats, so I decided to use my Hello Kitty Greetings Cricut Cartridge for her card.  There was so many cute kitty’s to choose from, but I decided to use the one with the balloons so that I could Rubber Stamp some sentiments on.

I cut the Hello Kitty on my Cricut Expression Machine.  I set my size to 5″, and you can see it was the perfect size.  I added some happy birthday wishes and a candle and present with “perfectly clear stamps” and black color box pigment ink.  I also used Star Dust Stickles around the bow and clothing  for a little sparkle.

hellokittycard50

Make it a Great Day and don’t forget to leave time to Craft!

Page 2 of 3
1 2 3