Great Cricut Card Ideas

Why spend another penny on a store bought greeting card now that you own a Cricut cutting machine. You paid a lot for that Cricut, so let’s put it to work. Here are just a few Cricut Card Ideas that will get you started and allow you to use any of your cricut cartridges you choose.

The next holiday coming up on the calendar is Easter. When I think of what cricut card ideas I can come up with, I think of how your family and friends will react when they receive a handmade greeting card made by YOU. Now that you have your Cricut cutting machine and a variety of cricut cartridges, it is so easy to add your personal touch to a card.

If one of the cricut cartridges you have is the Cricut Doodlecharms cartridge, you can make a really cute handmade greeting card of the Easter Bunny or an Easter Basket filled with colored eggs. Or maybe another one of your cricut cartridges is the Cricut Wild Card cartridge so you can make a Filigree Easter Egg card. Another one of my Cricut Card ideas is if you have the Cricut Stretch your Imagination cartridge. You can make a card with a Bunny coloring Easter eggs or a bunny in a basket.

As far as all of the cricut card ideas I could come up with for Easter, not all of them need to have bunnies or eggs on them. Here is an example of using a different one of your cricut cartridges called A Walk in My Garden cartridge. With this cricut cartridge you can make beautiful daffodil, hyacinth, or tulip to be the theme of your card. You are the artist of this Easter card, show your creativity and have fun.

Then the next big card day is Mothers Day. Think of how your Mom will feel getting a handmade greeting card from her child. You will totally make her day. No matter what cricut cartridges you have you will be able to find some thing that will put a smile on her face, and of course you will do all of this with your magnificent cricut cutting machine. It could be as simple as a basic flower from the Plantin SchoolBook cartridge, that you cut into different sizes and layer on a card, and then add the words Happy Mothers Day, or to the Best Mommy in the World.

The great thing about your Cricut cutting machine and all the cricut cartridges that are available to you is that it gives you thousands of Cricut card ideas. You will see that your cards look so professional you will not be able to wait to send them out or start selling them. I’m going to get busy making my handmade greeting cards on my very own Cricut cutting machine, how about you?

Make it a Great Day and don’t forget to leave time to Craft!

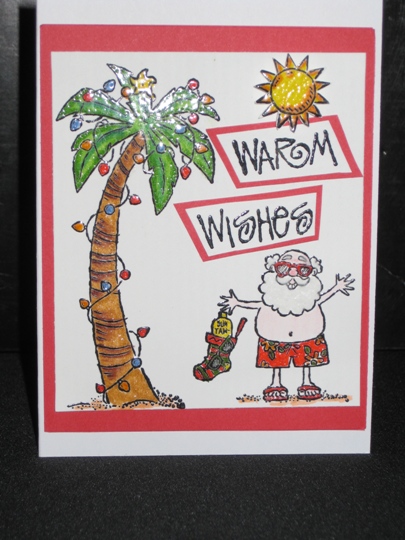
2008 Christmas Card

Well, I’m all done with all of my 70 hand stamped Christmas Cards. I went to the post office this afternoon to mail them all. So now it is safe for me to show you my 2008 Christmas card.

handmadechristmascardwithstampinupstamps

The stamps that I used are from Stampin’ Up!   Santa’s beard is fluffy. I used white flocking powder. It feels velvety soft. The sun is applied to the card with a round adhesive dot for dimension. All the coloring in was done with Marvy embossing pens and stamp-n-stuff clear embossing powder.

Wishing everyone a very Merry Christmas and a Fantastic 2009!

ORGANIZING YOUR CRAFT SUPPLIES – Part 2 of 3

Continued From Yesterday:

** Storage Containers. Do a little bit of research and purchase a Scrapbooking and/or Rubber Stamp organizer, which will hold papers, rubber stamps, supplies, etc. There are many products on the market that can help you keep it all together. Many office supply stores carry six-drawer organization stations. They’re vertical and have 6 see-through drawers of equal size. Each drawer can be designated for a different purpose -papers, templates/die-cuts, stickers, etc. Plus, they have wheels, which make them very easy to transport from one room to another. Or, if you often bring your Scrapbooking or Rubber Stamping supplies outside of your home when attending a crop party or to a friend’s house, use a portable system that isn’t too heavy and comes with a handle and wheels for easy transport. Again my favorite is Crop-In-Style Navigator. It holds everything that you need for a night out or weekend scrapping event. If you are a Stamper, Crop-In-Style also has a tote that has drawers inside to hold your rubber stamps and supplies called the Stamp Store that works really well.

** Try a kitchen gadget caddy. If you always Scrapbook and make Handmade Greeting Cards at home, use a kitchen utensil caddy with a number of divided compartments, like those you normally keep tall kitchen spoons, ladles, and spatulas in. They hold your markers and embossing powders in them perfectly. The ones that spin will you’re your most used supplies at your fingertips.

** Hang it up. If you’re lucky enough to have a Craft Room specifically for you Scrapbooking and/or making Handmade Greeting Card, hang a large pegboard above your work area. You can then attach scissors, templates, crimpers, rulers, stencils and more, all within easy sight and reach. In addition, you might hang a small ledge or shelf nearby, to store all of your corner punches, paper trimmers, embossing powders, and so on. If you prefer everything out in the open, this system will work like a charm. Check out the new Rack system by Lisa & Becky.

** Save stickers and shapes. Stickers and punched shapes can be kept in acid-free sheet protectors, plastic baseball card sheets, business card sheets. Each sheet should be categorized and labeled by theme: birthday, Christmas, Halloween, wedding, springtime, etc. Insert these sheets into a 3-ring binder. If you have a large number of stickers and shapes, you may want to purchase a sticker binder designed just for stickers. My favorite is from Crop-In-Style sticker binder.

** Minimize and organize magazines. Are your bookcase/shelves full of Scrapbooking magazines and or Handmade Greeting Card magazines? You can go through your magazines, find the articles you wish to keep and organize them into file folders by category, or in a 3-ring binder. In other words, keep the articles, toss the magazines. There are many Special Edition Magazines that I store in a large 3 ring binder all in tact.

** Choose a designated work area. Scrapbooking is more fun and less of a chore when everything is in one place. If possible designate a room, or a portion of a room, in your home for this activity .Organize your work area for increased productivity. Make sure it’s well lit. Find a comfortable chair to sit on and keep your supplies and tools within arm’s reach.

Organizing your craft supplies Part 1

Organize Scrapbooking Room Part 3

ORGANIZING YOUR CRAFT SUPPLIES – Part 1 of 3

Organizing Your Craft Supplies:

Find the system that works for you. Different personalities require different organization systems. Just get a system that works for you and the space that you work in. Also get a system that will allow you to grow as your supplies grow. You don’t want to keep changing your system all that does is confuse you and then you have no idea where you put things (I know, it’s happened to me).

If you find things easier when they’re alphabetized, then use that type of system. Perhaps you’re better at finding things by color, or maybe you prefer to organize by manufacturer. It’s all about finding the style that makes you most productive.

** Storing photographs. Once your photos are developed (or printed), you need to store them safely until you’re ready to put them in your scrapbook. Keep them separated by year or event. There are so many different products out on the market to store your photos in, just make sure that they are acid free and archival safe. Don’t forget to Label the outside this will save you time later when looking for a specific photo or event.

** Store embellishments and other items. Sometimes, for the purpose of creatively decorating your scrapbook, you may wish to keep tickets, brochures, maps and postcards, golfing score cards that are related to a particular trip or event. Use manila file folders, and label them so you know what is inside. File them away until they’re ready to be used. Once you want to add these articles to you scrapbook page, a good idea will be to spray them with an acid free, archival quality protective coating. Again there are many different kinds on the market. I use a spray from Rogers Craft Source called Scrapbook Protectant Spray.

** Organize paper. Where do you keep all of that cool paper until you’re ready to use it? Many Scrapbookers use paper racks to organize their paper. Vertical paper storage also is a great alternative this is my choice for storing paper. It is easy to pick out your favorite colored or pattern paper quickly. You can get a plastic, portable filing container just make sure that it is archival safe. There are also hanging file folders available. Label the hanging files by theme or color. If you don’t have room for all of these racks and filing cabinets, Crop-In-Style has a portable Paper Taker tote that also works fantastic for all size papers.

You may also want to buy acid free photo boxes to hold blank Greeting Cards and Envelopes for your handmade card. You can label the outside of the box with the size of the cards and also the color of the cardstock. This helps when looking for a specific size/color blank card.

** Storing Rubber Stamps. Shallow, plastic containers work best. You shouldn’t stack rubber stamps; the reason is that it will be easier to see the top of the stamp that shows your design. In my case I have thousands of stamps so I do have some that are stacked but I also have then in plastic containers that are labeled with the theme of the stamps inside.

** Store tiny stuff. For very tiny die-cuts and other small items such as brads or eyelets, check out storage containers at your local craft store or even hardware store. They have great items for organizing. Baby food jars or any clear containers serve the same purpose.

** Keep it together. Already have a pretty good idea of stickers and die-cuts you’re planning to use with a particular set of photographs? Keep them in the same storage product that you have chosen for your photos until you’re ready to put them into your scrapbook. This way, everything will be in one place and ready to use.

Have a Great Day and don’t forget to leave time to Craft!

Organize Craft Supplies Part 2

Organize Scrapbooking Room Part 3

Page 3 of 3
1 2 3