Hello My Fellow Crafters,
I hope you all had a wonderful and relaxing Easter.
Today I want to share with you the Easter Card I made this year.
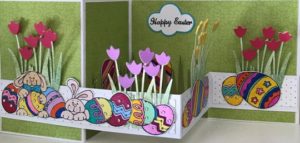
Who says you need real eggs to color at Easter…I didn’t color real eggs, but I sure had fun coloring these paper ones 🙂
The card base I used is called a Z fold which is super easy to make, plus it gives your card such a great look.
Using the Cricut Explore Air machine I cut out the flowers, stems and grass. Since you could see the back of the flowers with this type of card, I cut the flowers out twice so I could glue them to the front and back of the stems.
And it can’t be an Easter Card without some Bunnies and Eggs, so I used a few stamps that I had of cute Easter bunnies and Easter eggs. Colored with Copic markers and some Spectrum Noir markers, then cut them out by hand and arranged them on the card.
This was such a fun card to make and of course I finished it off with some “bling” using rhinestones to decorate the eggs.
Just a reminder, If you plan on purchasing some Cricut products, there is FREE SHIPPING till the end of the month, and saving money on shipping means you can buy more products 🙂
Make It A Great Day and Don’t Forget To Leave Time To Craft!